6 Planning Phase Three: Vegetation Analysis
6.1 Introduction
We are now in Phase Three of the process of planning. Phase One began with defining the overall objectives of the revegetation project, the management areas (revegetation units), and the natural models (reference sites). Phase One included conducting preliminary assessments of vegetation, climate, and soils, as well as defining appropriate Desired Future Conditions (DFCs) for each revegetation unit. In Phase Two, site factors that might limit or aid the establishment of vegetation were identified and analyzed, including which limiting factors in the roadside environment could be mitigated. Now that the environment has been defined, the task is to fully analyze the vegetation of the site.
In Phase Three, you will gather information about native vegetation on the reference sites and revegetation units. With this information, you will be able to refine the DFCs and consider the most appropriate revegetation methods to meet your objectives. By the end of Phase Three, you should have:
- Completed the vegetation assessment of all reference sites, creating a comprehensive species list and defining plant communities and successional processes;
- Determined which species and groups of species will be used on the project; and
- Identified target plant requirements and created a menu of potential stocktypes and plant establishment methods for revegetating the site.
In Phase Four, elements from these previous phases will be pulled together into a comprehensive revegetation strategy.
6.2 Vegetation Assessments
The objective of assessing vegetation is to: 1) create a comprehensive species list, 2) define plant communities, and 3) identify successional processes. To do this, information about species and communities that was gathered in Phase One is revisited and supplemented as necessary with additional fieldwork. This information will be used to select species, stocktypes, and planting strategies for revegetation.
To develop a comprehensive species list and define plant communities and processes, you will need to revisit your maps and literature, and review the field data that you collected from reference sites in Phase One. These include:
- Vegetation and soils maps including noxious weed maps;
- Plant association guides;
- Maps and literature about threatened, endangered, or sensitive species;
- Information about roadside management practices;
- Species lists and vegetation descriptions from literature and/or local contacts; and
- Species lists and vegetation descriptions from reference sites and project area.
6.2.1 Organize the Comprehensive Species List
Compile a comprehensive species list and organize your list into life forms:
- Trees,
- Shrubs,
- Annual grasses,
- Perennial grasses,
- Annual forbs,
- Perennial forbs, and
- Sedges and rushes.
6.2.2 Define Plant Communities and Ecological Settings
Species should also be identified according to plant communities and ecological settings, as described in Phase One. For example, communities should be grouped as they appear in different ecological settings:
- Hot/dry,
- Warm/dry,
- Cool/moist, and
- Cold/dry.
6.2.3 Identify Successional Processes
Species should be identified according to their successional group:
- Early seral,
- Mid seral,
- Late seral, and
- Climax.
The next step is to analyze the above information so that you can select species, nursery stocktypes, and outplanting methods to match the needs of your project.
6.3 Develop Species Lists for the Project
From the vegetation assessment, each species on the comprehensive species list is considered for potential use on the project. This is accomplished by screening potential species through the following criteria:
- Workhorse species,
- Working groups (groups of workhorse species),
- Specialist species, and
- Research and trial species.
6.3.1 Determine the Workhorse Species
"Workhorse species" is a term used to describe locally-adapted native plants that have the following characteristics:
- Broad ecological amplitude (that is, occurring in many different environments),
- Abundance, and
- Ease of propagation and ability to survive well on roadsides.
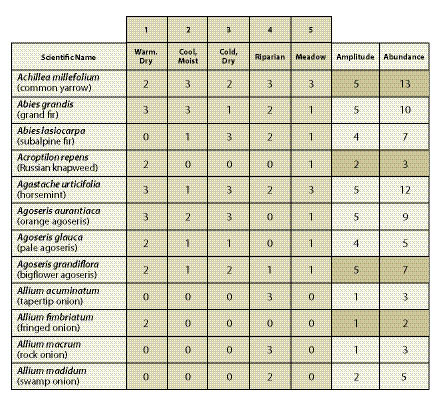
If native species fulfill all three requirements, they will be the main species used in revegetation. Tables 6.1 and 6.2 illustrate how the process of selection works.
6.3.1.1 Amplitude
Workhorse species have broad ecological amplitude, occurring in many different environments. The main criterion for workhorse species is amplitude (Table 6.1), or the recurrence of the species across a wide array of ecological settings. For example, if surveys revealed the same species on both hotter, drier environments and north-facing slopes on the project, that species has a high ecological amplitude.
6.3.1.2 Abundance
Abundance indicates the quantity, dominance or cover of species on each revegetation unit (0=never, 1=rare, 2=common, 3=abundant) (Table 6.1). It is summarized for the road project by adding together the abundance ratings given for the species in each revegetation unit.
6.3.1.3 Ease of Propagation
Species that have high amplitude and are abundant may also lend themselves to propagation. Ease of propagation usually involves the following characteristics:
- Plant materials (seeds, seedlings, or cuttings) are relatively easy to collect and process;
- Seeds, plants, and cuttings are easy and inexpensive to propagate and culture in a nursery;
- Seeds store well (longevity);
- Seeds do not have special requirements for breaking dormancy.
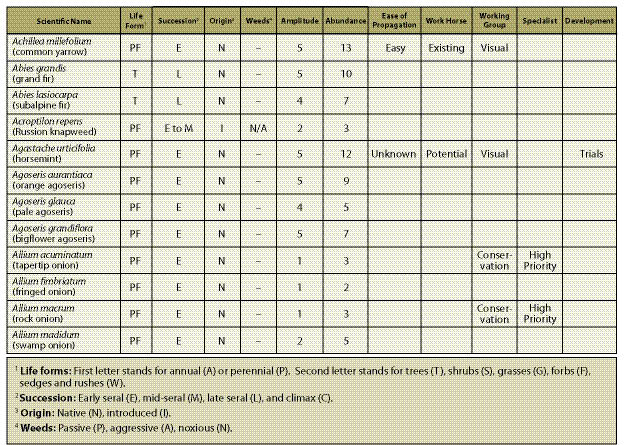
It is now possible to determine which species are potential workhorse species for your project. The species that score high in amplitude, abundance, and ease of propagation will be the workhorse species you will choose to utilize on the project. Table 6.2 gives an example of how workhorse species were identified from a comprehensive species list.
6.3.2 Develop Working Groups
The goal of roadside revegetation is not merely to establish plants, but to create functioning, sustainable plant communities. For revegetation purposes, a "working group" is a mix of workhorse species developed for a specific ecological function or management objective. One of the best ways to identify working groups is to review the comprehensive species list and determine which workhorse species commonly occur together on similar reference sites. For example, if five species that commonly occur together on recently disturbed reference sites have been identified, you have probably identified a working group.
Working groups should also meet both short- and long-term project goals. When designing working groups, remember that it is possible to establish different species at different times. For example, grasses may need to be established early for controlling surface erosion. Outplantings of shrubs or trees could be done later to increase species diversity and encourage long-term slope stability. Workhorse species and working groups are not only mid and late seral, but also climax species.
The groups are further defined by their ability to fulfill certain management criteria. For example, can this group of plants be utilized (perhaps with some modification) to perform functions that fulfill project objectives, such as weed control, conservation goals, soil stabilization, or visual enhancement?
6.3.2.1 Weed Control
One of the most important ecological functions that plants can serve during revegetation is to occupy the site so there is no niche available for invasive species to establish. By occupying ecological niches from spring to fall with a combination of annual and perennial native species, site resources such as moisture, nutrients, and space, are denied to undesirable species. Working groups that are effective in controlling weeds are usually composed of a mix of forbs, grasses, grass-like species, and trees and shrubs that exploit the whole growing season and occupy multiple ecological niches (Sheley 2005).
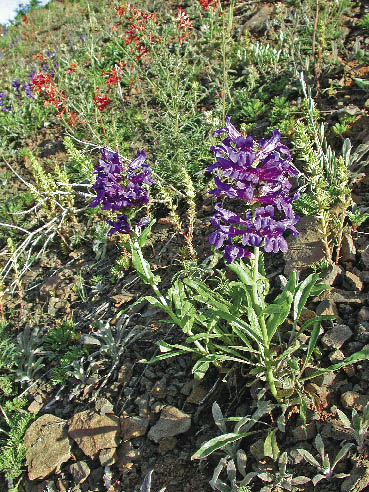
6.3.2.2 Visual Enhancement
A high-visibility site might call for a species mix to include wildflowers and other showy plants for roadside beautification. These species can be practical "workhorses" that provide valuable functions, but also maximize color and visual enhancement throughout the season (Figure 6.1).
6.3.2.3 Erosion Control
On sites where erosion control is an important management objective, the working group would be based on plants that are highly effective for erosion control. This includes species which germinate and grow quickly, produce a high ground cover, generate biomass throughout the season, and survive for several years.
6.3.2.4 Conservation Enhancement
As a functioning plant community, the working group increases the ecological health and biodiversity of project sites. In some cases, a working group will specifically focus on a group of species that are important for ecological and/or societal reasons. These can include sensitive species or species that are desired by the public.
6.3.3 Identify Specialist Species
Working groups will not always be made up of workhorse species and there may be a need to propagate "specialist" species. The development of the working groups for a revegetation project will determine which additional specialist species will be needed. Since there may be very little information about the propagation of specialists, the number of species placed in this category should be prioritized and limited. If only a small number of specialist plants are needed, then other revegetation methods besides seed propagation should be considered. These include wild and nursery grown cuttings and plants. Some areas may contain special microclimates or soils that require a unique mix of species, or working group, that are typically not available. Seeps, springs, and serpentine soils are examples of some special environments. The important concept is that, for each project objective, a working group can be developed to meet that objective.
6.4 Identify Target Plant Requirements
Now that you have a list of which species to use for revegetation, the challenge is to determine how to propagate them and what is the best plant material for a particular site or objective.
One of the most useful tools for selecting the plant materials best suited to the project is the Target Plant Concept (Landis and others 2006). The Target Plant Concept is a holistic way of integrating how aspects of plant propagation, project site characteristics, and outplanting methods affect the selection of appropriate plant materials. The concept is based on the premise that there is no such thing as an "ideal" all-purpose seed mix or stocktype that will always work in any situation. Instead, the fitness of the plant material is determined by its appropriateness to the site in which it will be outplanted.
The Target Plant Concept consists of 6 requirements for establishing native plants (Figure 6.3). At this point in the process, two of them have been covered: the objectives for establishing vegetation, and the factors that possibly play the largest role in limiting plant survival and growth on each revegetation unit.
| Figure 6.3 — The Target Plant Concept identifies 6 requirements for establishing native plants (adapted from Landis and Dumroese 2006). | 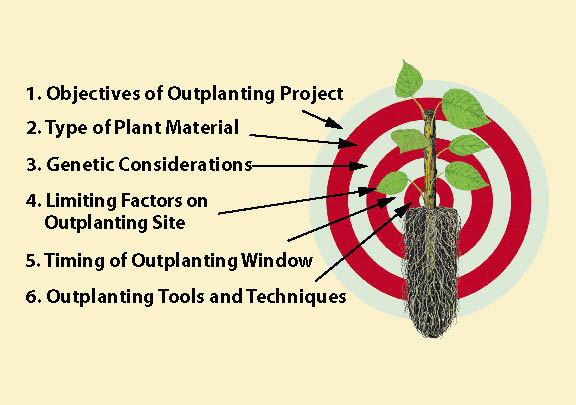 |
The remaining questions to ask are:
- What are appropriate genetic sources for each species?
- What type of plant material should be used (seeds, cuttings, or plants)?
- What methods will be used to install plant materials and what post installation plant care is appropriate?
- What is the proper season for outplanting or seeding (the outplanting or seeding window)?
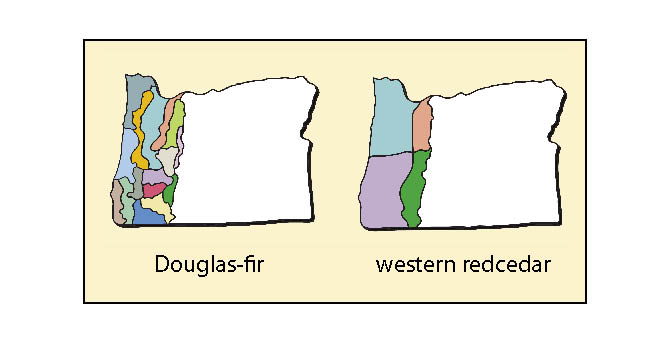
6.4.1 Ensure Local Adaptation and Maintain Genetic Diversity
It is important to know the original collection source of seeds, plants, or cuttings to help ensure better long-term adaptation to local conditions and protect the genetic resources of local plant communities. Seed transfer guidelines (how far plant material can be transferred from point of origin to the project) have been developed for many forest tree species. This was the outcome of years of research that revealed that failures in tree planting establishment were sometimes the result of moving seeds too far from their source of origin. Although work is underway, guidelines for plant material movement are lacking for many native grasses, forbs, and shrubs used in revegetation activities. As a result, many native plants of inappropriate or unknown origin are being sold and planted in revegetation projects, despite the strong concerns. Mechanisms are available to help revegetation specialists choose appropriate materials (Insets 6.1 and 6.2).
6.4.2 Consider Plant Establishment Methods
Once species have been chosen and genetically appropriate sources of plant materials have been identified, the next step is to determine the most appropriate plant materials for the project. Revegetating with native plants commonly involves multiple methods to reestablish vegetation on the project site. Possibilities to consider are:
- Maximizing natural regeneration/recovery,
- Direct seeding, and
- Outplanting nursery stock.
In areas with relatively good soil stability that are bordered by healthy populations of viable native species, the existing seed bank and natural regeneration processes is a key part of re-establishing native vegetation on road sites. Minimizing the road footprint and damage from road construction is an important aspect of any type of planning, but will be especially key if revegetation tactics will involve supporting natural regeneration over more intensive revegetation interventions. In these cases, as long as topsoil is saved, the disturbance from road construction might serve to scarify the native seed bank. Often the option of maximizing natural regeneration is not sufficient to fully revegetate a roadside environment; nevertheless, it should always be considered as a possibility. Salvaging and reapplying duff and litter layers to disturbed surfaces can aid in maximizing natural regeneration. The revegetation plan should acknowledge aspects of the revegetation process that are expected to develop naturally (Clewell and others, 2005).
Inset 6.2 — What To Do If There Are No Locally Adapted Native Seed The volume of seeds needed for a revegetation project may not always be available in sufficient quantities, particularly when plans have changed or the revegetation specialist has not been involved until the latter stages of the project. In these instances, there are three choices available to the revegetation specialist: 1) wait several years until the appropriate seeds are available; 2) use non-native cultivars or non-local native cultivars; or 3) use introduced species that are non-persistent, non-invasive, or sterile. Defer Seeding If the appropriate species or seed sources are not available, then consider not seeding until the appropriate seeds become available. In the interim, soil cover for erosion control should be considered. Non-Local Native Species Native species that do not occur naturally in the local ecosystem, or native plant material that does not originate from genetically local sources, may be considered. These types of plant materials may include commercial cultivars. A cultivar is "a distinct, often intentionally bred subset of a species that will behave uniformly and predictably when grown in an environment to which it is adapted" (Aubry and others 2005). These cultivars are generally not preferable for wildland use due to concerns over adaptability, genetic diversity level, and the potential for genetic contamination, or "swamping," of local native gene pools, including those of threatened, endangered, and sensitive plants (Millar and Libby 1989; Knapp and Rice 1994; Linhart 1995; Montalvo and others 1997; Lesica and Allendorf 1999; Hufford and Mazer 2003). Because commercial cultivars are typically selected for agronomic traits, such as high fecundity, vegetative vigor, and competitive ability, their use may also adversely impact resident natural populations through direct competition and displacement. Moreover, cultivars of native species (and introduced look-alikes such as sheep fescue [Festuca ovina]) can be very difficult to distinguish from native germplasm. This could severely complicate efforts to collect and propagate local material and waste valuable economic resources. Because of these concerns, cultivars should be used sparingly, with project objectives clearly understood. Consult with the seed producer or distributor before buying seeds and ask for the most appropriate cultivar for your area, where the source for the cultivar was collected (geographic location and elevation), and how many collections were made. The seeds should be certified with a certification tag attached to each seed bag. Tests for seed germination, purity, noxious weeds, and seeds per pound should be obtained. Introduced Species When appropriate seed sources are not available, sterile hybrids or annual/biennial/perennial introduced plant species that are non-persistent and non-invasive may be considered. Preferred non-native species are those that will not aggressively compete with the naturally occurring native plant community, invade plant communities outside the project area, persist in the ecosystem over the long term, or exchange genetic material with local native plant species. Some of these species include sterile hybrids, such as Regreen (a wheat x wheatgrass sterile hybrid) and annuals such as common oat (Avena sativa) and common wheat (Triticum aestivum). Exotic species that have not already been introduced into the area, or that have been found to be aggressive and/or persistent, should be avoided. Non-native species that were commonly used in the past should be avoided include Kentucky bluegrass (Poa pratensis), smooth brome (Bromus inermis), crested wheatgrass (Agropyron cristatum), orchardgrass (Dactylis glomerata), yellow and white sweetclover (Melilotus officinalis and M. albus), alsike clover (Trifolium hybridum), and alfalfa (Medicago sativa), to name a few. These species are generally no longer recommended due to their highly aggressive nature, resulting in widespread losses or displacement of native species and plant communities in western wildlands. |
However, if native seed regeneration is not sufficient to revegetate the site, additional plant materials will need to be obtained and established. Plant materials may include:
- Seeds,
- Cuttings, and
- Plants.
Determining which plant material to select for revegetation depends on the type of species being grown. For example, conifer trees have been shown to establish better and faster from plants than from seed or cuttings. On the other hand, grasses can be established from plants, but growing grass plants and planting them is very expensive compared to using seeds. Some species, however, do not produce reliable crops of seeds and therefore other plant materials, such as cuttings, will have to be used. Tables 6.3 and 6.4 compare the advantages and disadvantages of different establishment methods and stocktypes. Various Implementation Guides (Chapter 10) describe obtaining plant materials in greater depth.
6.4.2.1 Seeds
Seeds are collected in the wild from native stands of grasses, forbs, shrubs, trees, and wetland plants. This plant material is used for seeding projects, such as hydroseeding of cut and fill slopes or other large areas of bare soil. Seeds of grass and forb species are best used for direct sowing, whereas seeds of shrubs and tree species are best used to grow nursery plants. If large amounts of grass or forb seeds are required for a project, seed collections can be increased through seed increase contracts. It can take up to three years to obtain enough seeds for a revegetation project — one year to collect the wild seeds and one to two years for seed increase. One of the advantages of utilizing seeds as the plant material is that seeding can be an inexpensive method of reestablishing plants for a large area. Guides to collecting wild seeds, increasing seeds, and salvaging and topsoil, duff, and litter are available in Chapter 10.
6.4.2.2 Cuttings
Cuttings are taken from stems, roots, or other plant parts and directly planted on the project site or grown into rooted cuttings at a nursery for later outplanting. Only a few species, such as willow (Salix spp.) and cottonwood (Populus spp.), can be easily established from direct sticking of cuttings on a project. Other species, such as quaking aspen (Populus tremuloides), can be established from cuttings in a controlled nursery environment, but not in the field. Propagating plants from cuttings of most species is not possible under most growing conditions. Cuttings are collected in the wild in the winter months and either stored or immediately planted on the project. If large quantities of cuttings are required, cuttings can be propagated by growing them in stooling beds for several years at a nursery or other growing facility. Guides to working with cuttings are presented in Chapter 10.
6.4.2.3 Plants
Trees and shrubs are typically established using nursery stock rather than by direct seeding for several reasons. First, obtaining seeds from most tree and shrub species is expensive; in many years, they can be difficult to find or collect. Second, shrub and tree seeds germinate and grow into seedlings at a slower rate than grass and forb species, giving them a disadvantage on the sites where grasses and forbs are present. Starting shrubs and conifers from large plants instead of seeds gives them a competitive advantage over grasses and forbs because roots are often longer and better developed, allowing access to deeper soil moisture. Grass and forb species are seldom established from nursery-grown plants because of the high cost. Exceptions are when grass or forb seeds are rare or hard to collect or increase; if species are difficult to establish from seeds on disturbed sites; or when the project requires restoring threatened or sensitive species.
Plants are typically grown in a nursery. However, for some projects, plants are salvaged from the construction site or adjacent areas. Sometimes salvaged plants are simply relocated quickly from one area to another. At other times, they may be transplanted into a nursery and replanted at a later time. Plants that are grown in a nursery require a lead time of one to two years from the time of ordering to availability. A variety of stocktypes are available from the nursery, including small to very large plants; plants in containers or those without soil around the roots (bareroot); and plants grown in greenhouse environments or field-grown plants (Figure 6.5). Selecting a stocktype will depend on the needs of the project, as there are multiple options for propagation and establishment, and many stocktypes to choose from.
Table 6.3 — Comparison of plant material types for revegetation planning (adapted from Dorner 2002). |
||
Type |
Advantages |
Disadvantages |
Balled-in-burlap The plant is grown in the field, dug up with its roots and surrounding soil, and wrapped in a protective material such as burlap. |
|
|
Bare-root The plant is sold without any soil around its roots. |
|
|
Container The plant is sold in a container of potting media or soil with drainage holes. Sizes and shapes of containers range from very small to very large. |
|
|
Liners/Plugs A small plant, rooted cutting or seedling that is ready for transplanting. They are often used for herbaceous plants and grasses. |
|
|
Cuttings A piece of branch, root or leaf that is separated from a host plant and used to create a new plant. These may be placed in a rooting medium or stuck directly into the ground for planting. |
|
|
Salvage Native plants that are removed from a site (to a nursery, storage area, or directly to another field location) before ground disturbance at that site occurs. (Can also refer to salvaged cuttings or seed sources.) |
|
|
For any stocktype, various desired characteristics should be defined including age, size, change of survival on the site, ability to compete with other vegetation and/or tolerate animal impacts; and methods that will be necessary to outplant and maintain the stocktype. For bareroot stocktypes, size, age, and potential survival rates should be considered. For cuttings, consider if the project requires containerized cuttings (with a root system in a container), heeled cuttings (with roots, but no container) or simply cuttings to stick directly in the ground on the project site. For cuttings, length, caliper, and issues of storage are also important factors. For container plants, no standard terminology exists for describing the different types of container plants available (Landis and others 1992). They are usually described by their container type, referring to the volume and usually the shape of the container. Size and age of the plant is also described. When ordering container plants, consider age, caliper, height, root size and depth, and any other special characteristics that might help the plant survive in the field (Table 6.3).
Salvaging plants from the project area can be an important component of protecting native plant diversity on the project site. Sometimes salvaged plants are simply relocated instantly from one area to another. Other times, they may be transplanted or moved to a nursery area, cared for, and then re-planted at an appropriate time. "Salvage" may also involve harvesting cuttings or seeds from plants that are going to be removed during the road construction process.
Depending on the species, genetics, site limiting factors, and specific project objectives, some idea of the appropriate "target" stocktypes will already be defined. For example, some plants respond well to certain propagation methods, some will be salvaged ("wildings") from the site, and some are obvious candidates for direct seedling applications in order to facilitate fast regeneration. The needs and characteristics of a particular species will help determine if direct seeding, nursery propagation, or other methods are the more appropriate strategy. There are many options to consider. Some of these options are summarized in Table 6.4.
| Table 6.4 — Comparison of different plant establishment methods (adapted from Landis and others 1992). | ||||
On-Site Methods |
||||
Characteristic |
Wild |
Cuttings |
Seeds |
Nursery Plants |
Efficient use of seeds and cuttings |
N/A |
NO |
NO |
YES |
Cost of establishment |
HIGH |
MODERATE |
LOW |
MODERATE |
Ability to establish difficult species |
YES |
NO |
NO |
YES |
Option of using specific genotypes |
NO |
NO |
YES |
YES |
Precise scheduling of plant establishment |
YES |
YES |
NO |
YES |
Control of stand composition and density |
YES |
YES |
NO |
YES |
Matching stocktypes to site conditions |
NO |
NO |
NO |
YES |
Depletion of adjacent plant stands |
YES |
YES |
NO |
NO |
6.4.2.4 Scheduling
| Figure 6.5 — Nursery stock is available in many container sizes and shapes. Consider the advantages and drawbacks of different options before ordering plants. |
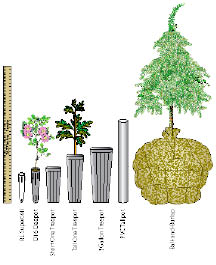 |
Timing is a key factor for obtaining plant materials because many native plants or seeds are not widely available from nurseries and seed companies. Even if a species is available, the odds are that it is not from a local source that is genetically adapted to your project site. Therefore, the earlier you start planning the better. It usually takes a lead time of two to three years to administer seed collection, seed increase, and seedling propagation contracts. Sometimes you may need to allow three years to achieve sufficient quantities of seeds. Plants (seedlings, cuttings, and so on) ordered from nurseries take a great deal of advanced planning for both seed collection and for plant propagation. Failure to realize the lead time necessary for seed collection and propagation of appropriate native plant materials is one of the most common mistakes made in revegetation projects.
6.4.3 Select Plant Material Installation and Maintenance Methods
There are many methods of installing plant materials on the project site. Seeds can be applied through hydroseeding equipment, disked or drilled into the soil surface, broadcast sown, imprinted, and/or covered with a variety of types of mulch. There are also a variety of techniques for installing cuttings and plants, including an expandable stinger (Figure 6.6), waterjet stinger, pot planter, auger, and regular old shovel. These methods are discussed in Chapter 10.
After plant materials have been installed, care is required until they are well-established. This includes protection from browsing animals, high temperatures, winds, competing vegetation, and drought. Measures that can be taken to mitigate for browsing animals include installing netting and tree shelters, as well as applying animal repellents. Seedlings can be protected from high temperatures and wind with shade cards, tree shelters, and large obstacles, such as logs. Competing vegetation is controlled through weeding, mulch, or herbicides. In extremely dry conditions, soil moisture can be supplemented by using irrigation systems.
6.4.4 Determine Outplanting Windows
In addition to ensuring you have enough lead time to successfully carry out native revegetation goals, you also need to determine the seasons for planting. There are advantages and disadvantages to carrying out operations at any time in the year and determining the timeframe should be based on the species, plant material, and site factors.
The optimum time of year to outplant for greatest plant survival is called the outplanting window. It is determined by graphing the annual precipitation, temperatures, and snow accumulation of a site. This information can be obtained from climate stations, as described in Phase One. Outplanting windows are also defined by the species, stocktype, and outplanting methods. For example, two different species of bunch grass might have very different survival rates depending on when they were outplanted. Figure 6.7 shows survival rates for bluebunch wheatgrass (Pseudoroegneria spicata), which survived better when planted in fall, and spreading needlegrass (Achnatherum richardsonii), which did better when planted in spring.
| Figure 6.6 — Match stocktypes to outplanting options and equipment available. The expandable stinger (A) is a special planting machinery that attaches to the arm of an excavator. Long-tube stocktypes are placed in the stinger and pushed in the soil (B). The stinger opens and plants the seedling in the soil (C, D). This machinery can reach very steep, rocky slopes that are inaccessible for manual planting. | |
A 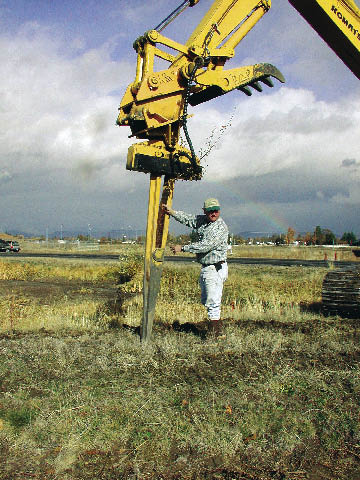 |
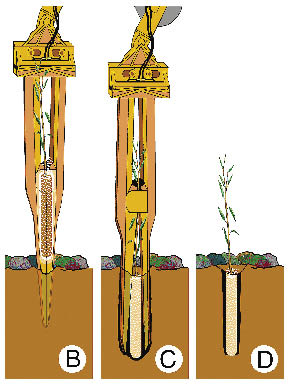 |
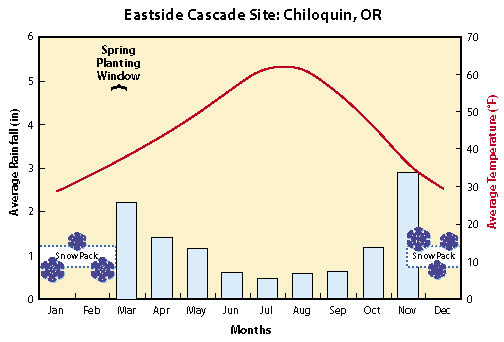
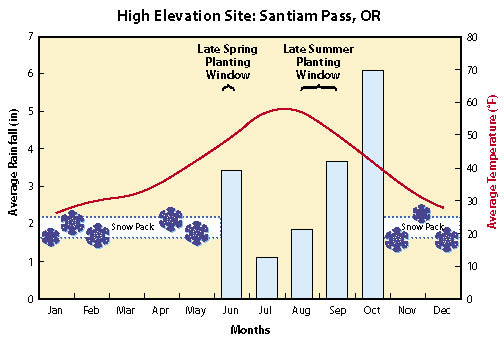
Several factors are important for determining outplanting windows. These include 1) soil temperatures in late winter and early spring, 2) precipitation during spring and early summer, 3) soil temperatures in fall, 4) precipitation in fall, and 5) snow cover. Three examples of identifying outplanting windows are provided in Figures 6.8, 6.9 and 6.10. Applying the following set of guidelines to the climate data will help clarify the optimum times to plant.
6.4.4.1 Soil Temperatures in Late Winter and Spring
Seedlings must develop new roots soon after they are planted to become established and survive the hot (and in many regions, dry) summer of the first growing season. For most species, new root growth occurs when soil temperatures exceed 42 °F. Waiting for soil temperatures to warm to 42 °F in the spring before outplanting, however, will shorten the period of time when soil moisture is available to the seedling. For this reason, a common restoration strategy is to outplant seedlings as soon after the last threat of a deep frost in the winter has passed, even if the soil temperatures are below 42 °F.
| Figure 6.7 — Outplanting must be timed properly for best results given site conditions and species requirements (reproduced from Page and Bork 2005). | 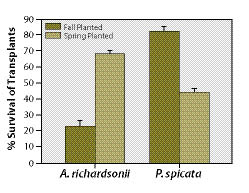 |
| Case Study: Low Elevation, Western Cascade Site |
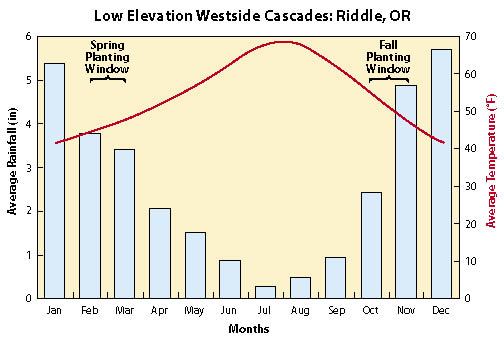 |
The site has two planting windows. The spring planting window starts after the risk of the last winter cold front in mid-February has passed and ends two months before monthly precipitation dips below 1.5 inches. The fall planting window begins as soon as the first fall rains wet the soil profile and ends one month prior to soil temperatures dropping below 42 °F. Long dry summers, coupled with high temperatures and strong winds, create challenges to establishing seedlings. Outplanting in the fall or in mid to late winter is essential in order to develop new roots. Removing grass and other vegetation from around the seedling and applying a mulch fabric in March increases soil moisture. In places, tree shelters and shade cards placed around seedlings can protect them from the drying effects of the afternoon wind. Hydroseeding in October with mulch and tackifier will keep seeds in place long enough to germinate in November. Complete seedling establishment will occur by the following April. |
| Case Study: Cool, Arid Site |
 |
Grass and forb seeding in September and October is essential since most seeds from this area require a stratification period. Seeds will not germinate in the fall because of the lack of continuous fall moisture and low temperatures. Germination occurs immediately after snowmelt in the spring. Seed germination can be poor because the soil surface dries out quickly due to low humidity, high solar radiation, and low precipitation. Mulching the seedbed with ground wood fiber or straw will maintain high humidity around germinating seeds. Spring seeding can be successful if seeds are soaked for several days prior to seeding and if seeding is done as soon as snows have melted. |
| Case Study: High Elevation Site |
 |
Weather station data indicate average minimum air temperatures are cold during the growing season. Applying tree shelters around seedlings will increase daily air temperatures, creating a more favorable environment for seedling growth. North aspect seedling plantings might benefit more from tree shelters than south aspect plantings. Sowing can take place in the late spring, immediately after snowmelt, and again in the fall. Late spring sowing will be significantly enhanced by applying mulch over the seedbed and/or pregerminating seed prior to sowing. Seeds of species that do not require stratification should germinate within a month after sowing in late spring. Species requiring stratification should be sown in the fall. |
6.4.4.2 Precipitation in Spring and Summer
Much of the western United States experiences dry summers, with winters receiving most of the precipitation. Under this regime, soils lose their moisture in the summer and recharge from storms that occur in the fall and winter months. Plants have adapted to this climate by growing new roots and leaves during the spring, when soil moisture is high, and shutting down or becoming dormant in the summer, when soil moisture is depleted.
The most critical factor for seedlings that are outplanted in the spring is the length of time available for the seedling to develop new roots before soil moisture is depleted. Sites with little or no precipitation in the spring or summer will dry out faster than sites with high spring and summer precipitation. A rule of thumb is that an average monthly precipitation of less than 1.5 inches will do little to recharge a dry soil during late spring through fall. Figures 6.8, 6.9, and 6.10 show spring outplanting windows for three very different project sites. On low elevation sites west of the Cascade Mountains, the planting window can be fall and spring (Figure 6.8), whereas high elevation sites might have a planting window only in late spring (Figure 6.10).
6.4.4.3 Soil Temperatures in Fall
If outplanting is planned for late summer or early fall, it is important that soils have high moisture and temperatures are warm enough to encourage new roots to grow into the soil before winter arrives. On cold sites where seedlings are not protected by snow, the upper portions of the soil profile will typically freeze. Fall outplanted seedlings that have not established new roots below the frost line risk desiccation by wind or sun exposure in the winter months because no water is available to the seedling. For greatest success, soil temperatures should remain above 42 °F for at least one month after seedlings are planted in the fall for root development and seedling establishment prior to winter. Figure 6.10 shows a late summer planting window on a high elevation site where precipitation is high in September and soil temperatures are above 42 °F.
Soil temperatures are significantly warmer on south aspects, which means that outplanting windows on south exposures are often wider and extend further into the fall than planting sites on north aspects, given soil moisture is adequate for root growth. Weather stations do not report soil temperatures. However, they can be extrapolated from average monthly air temperatures with a certain degree of reliability. Placing recording thermometers in the soil before construction will give more exact soil temperatures.
6.4.4.4 Precipitation in Fall
When outplanting seedlings in the fall, high soil moisture is essential for seedling survival and growth. Fall soil moisture is typically very low, and the only means of recharging a dry soil is through rainstorms or irrigation. Two or more inches of rain over a period of at least several days is often required to moisten most dry soils. Many sites in the western United States, however, seldom have rainstorm events great enough to moisten the top 12 inches of soil before cold soil temperatures occur. Fall planting on these sites has a low potential for seedling survival. On sites with sufficient fall precipitation, planting windows are open as soon as a rainstorm event wets the surface 12 inches of soil.
6.4.4.5 Snow Cover
Seedlings should not be planted through snow, so outplanting windows are open before snow accumulation and after snowmelt. Be aware, however, that cold water from melting snow keeps soil temperatures low. Soil temperatures should be monitored during or following snowmelt.
6.4.5 Determine Sowing Windows
The outplanting windows for seed sowing may be different than those for planting nursery stock. Optimum planting times for seeds are called "sowing windows." Sowing windows change by site environment, sowing methods, and seed needs. Seeds will germinate and develop into healthy, viable plants when: 1) seed stratification requirements are met, and 2) seeds are in a warm, moist environment during germination. Seed stratification requires a cold, moist period, ranging from a few weeks to several months, during which time the seeds are conditioned for germination. This usually occurs naturally in the western United States during the early to mid spring, but it can be induced artificially in seed coolers.
After seed stratification requirements have been met, a moist, warm period must follow in which seeds and soil do not appreciably dry down. Drying during this time can prevent germination and kill new germinants. In the western United States, these conditions are best met by sowing seeds in the late summer to early fall. On warm, moist sites (e.g., Figure 6.8), seeds that require a very short stratification period will germinate in the early fall and begin to establish ground cover before winter rains occur. Fall-sown seeds requiring stratification will have moisture and temperature requirements met during the winter months. On drier sites (Figure 6.9), fall-sown seeds will not germinate due to lack of precipitation.
If fall sowing is not possible, sowing can take place in the late winter or early spring. Sowing at this time generally results in less vigorous stands of grass and forb seedlings because there is a shorter period of favorable conditions for seeds to germinate and seedlings to become established. Another drawback of spring sowing is that some species will not receive the required cold, moist period to break seed dormancy and germinate. Once germination has occurred, several months of periodic precipitation with average air temperatures exceeding 40 °F are required for successful establishment of ground cover.
Spring sowing can be enhanced in several ways. A mulch applied over the seeds will help maintain higher seed moisture levels and keep soil moisture in the soil for a longer period. Seeds requiring stratification can be artificially stratified for spring sowing to achieve earlier germination (Cook and others 1997). Care must be taken that the seeds do not mold or begin to germinate during this period, or dry down for sowing. The effect of hydromulch equipment on germinating native species seeds is unknown at this time; seeds may be damaged if sown using this method.
6.5 Next Steps
By the end of Phase Three, you will have completed an assessment and analysis of the native vegetation on your revegetation units and reference sites. You will have refined your DFCs for short- and long-term goals; gained an understanding of the species, plant communities, and successional processes; analyzed species and communities in order to select the species to be used for revegetation; and reviewed potential plant material types and seeding or outplanting methods to consider in order to revegetate the site. Now it is time to move to Phase Four, where all the elements will be integrated into a comprehensive strategy for road design, site treatments, and revegetation — the Revegetation Plan.