ROADSIDE REVEGETATION
An Integrated Approach to Establishing Native Plants and Pollinator Habitat

3.14 Select Plant Establishment Methods
After compiling a list of species and genetic sources to use for revegetation, the next steps are to determine the optimal propagation methods for each species and to identify the most appropriate plant material sources for a particular site or revegetation objective.
A useful tool for selecting the plant materials best suited to the project is the Target Plant Concept (Landis 2009). The Target Plant Concept (Figure 3-96) is an integrated sequential process for evaluating plant material requirements within the context of project objectives and site characteristics that may influence the suitability of seed sources or stocktypes, as well as the timing and optimal method of out-planting. The concept is based on the premise that there is no such thing as an "ideal" all-purpose seed mix, genetic source, or stocktype that will always work in any situation. Instead, the fitness of the plant material is determined by its appropriateness to the site in which it will be out-planted. Because every site is unique, seed mix and sourcing decisions should be tailored to each site or project to the extent possible. Otherwise, time and investments in site preparation, plant propagation, and outplanting may be wasted.
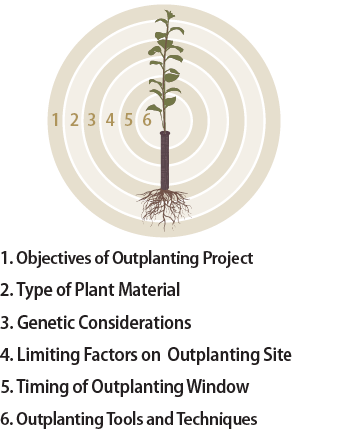
Figure 3-96 | The Target Plant Concept
The Target Plant Concept identifies six requirements for establishing native plants.
Adapted from Landis 2009
At this phase in the overall planning process, two of the steps in the Target Plant Concept have previously been covered: the objectives for establishing vegetation (Section 3.2) and the factors that possibly play the largest role in limiting plant survival and growth on each revegetation unit (Section 3.8).
The remaining target plant requirements to consider are as follows:
- What type of plant material should be used (seeds, cuttings, containerized or bareroot seedlings, or salvaged plants)?
- What methods will be used to install plant materials and what post-installation plant care is appropriate?
- What is the proper season for outplanting or seeding (the outplanting or seeding window)?
Once species have been selected and genetically appropriate sources of plant materials have been identified, the next step is to determine the most appropriate plant materials for the project. Revegetating with native plants commonly involves multiple methods to reestablish vegetation on the project site. The following are possible considerations:
- Maximizing natural regeneration/recovery
- Salvage existing plants
- Direct seeding
- Outplanting nursery stock
3.14.1 Selecting Plant Materials
In areas with relatively good soil stability that are bordered by healthy populations of viable native species, the existing seed bank and natural regeneration processes are key parts of re-establishing native vegetation on road sites. Minimizing the road footprint and damage from road construction are important aspects of any type of planning but are especially key if revegetation tactics involve supporting natural regeneration over more intensive revegetation interventions. In these cases, as long as topsoil is saved, the disturbance from road construction might serve to scarify the native seed bank. Often the option of maximizing natural regeneration is not sufficient to fully revegetate a roadside environment; nevertheless, it should always be considered as a possibility. Salvaging and reapplying duff and litter layers to disturbed surfaces can aid in maximizing natural regeneration. The revegetation plan should acknowledge aspects of the revegetation process that are expected to develop naturally (Clewell and others, 2005).
However, if native seed regeneration is not sufficient to revegetate the site, additional plant materials will need to be obtained and established. Plant materials may include the following:
- Seeds
- Cuttings
- Plants
Determining which plant material to select for revegetation depends on the type of species being grown. For example, conifer trees have been shown to establish better and faster from plants than from seed or cuttings. Alternatively, grasses can be established from plants, but growing grass plants and planting them is very expensive compared to using seeds. Some species, however, do not produce reliable crops of seeds and therefore other plant materials, such as cuttings, will have to be used. Table 3-15 and Table 3-16 compare the advantages and disadvantages of different establishment methods and stocktypes. Various implementation guides provided in Chapter 5 describe in more detail the process for obtaining plant materials.
Seeds
Seeds are collected in the wild from native stands of grasses, forbs, shrubs, trees, and wetland plants. This plant material is used for seeding projects, such as hydroseeding of cut and fill slopes or other large areas of bare soil. Seeds of grass and forb species are best used for direct sowing, whereas seeds of shrubs and tree species are best used to grow nursery plants. If large amounts of grass or forb seeds are required for a project, seed collections can be increased through seed increase contracts. It can take up to three years to obtain enough seeds for a revegetation project—one year to collect the wild seeds and one to two years for seed increase. One of the advantages of direct seeding is that it can be an inexpensive method of reestablishing plants for a large area. Guides to collecting wild seeds, increasing seeds, and salvaging topsoil, duff, and litter are provided in Chapter 5.
Cuttings
Cuttings are taken from stems, roots, or other plant parts and directly planted on the project site or grown into rooted cuttings at a nursery for later outplanting. Only a few species, such as willow (Salix spp.) and cottonwood (Populus spp.), can be easily established from direct sticking of cuttings on a project site. Other species, such as quaking aspen (Populus tremuloides), can be established from cuttings in a controlled nursery environment but not in the field. Propagating plants from cuttings of most species is not possible under most growing conditions. Cuttings are collected in the wild in the winter and either stored or immediately planted on the project site. If large quantities of cuttings are required, they can be propagated by growing them in stooling beds for several years at a nursery or other growing facility. Guides to working with cuttings are presented in Section 5.3.2, Section 5.3.5, and Section 5.4.3.
Plants
Trees and shrubs are typically established using nursery stock rather than by direct seeding for several reasons. First, obtaining seeds from most tree and shrub species is expensive; in many years, they can be difficult to find or collect. Second, shrub and tree seeds germinate and grow into seedlings at a slower rate than grass and forb species, giving them a disadvantage on the sites where grasses and forbs are present. Starting shrubs and conifers from large plants instead of seeds gives them a competitive advantage over grasses and forbs because roots are often longer and better developed, allowing access to deeper soil moisture. Grass and forb species are seldom established from nursery-grown plants because of the high cost. Exceptions are when grass or forb seeds are rare or difficult to collect or increase (often referred to as "recalcitrant" species); if species are difficult to establish from seeds on disturbed sites; or when the project requires restoring threatened or sensitive species that are typically not considered workhorse species.
Plants are typically grown in a nursery or agricultural setting. However, for some projects, plants are salvaged from the construction site or adjacent areas. Sometimes salvaged plants are simply relocated quickly from one area to another. At other times, they may be transplanted into a nursery and replanted at a later time. Plants that are grown in a nursery require a lead time of one to two years from the time of ordering to availability. A variety of stocktypes are available from nurseries, including small to very large plants—plants in containers or those without soil around the roots (bareroot)—and plants grown in greenhouse environments or field-grown plants (Table 3-15). Selecting a stocktype will depend on the needs of the project, as there are multiple options for propagation and establishment, as well as many stocktypes to choose from.
Table 3-15 | Comparison of plant material types for revegetation planning
Type |
Advantages |
Disadvantages |
Balled-in-burlap The plant is grown in the field, dug up with its roots and surrounding soil, and wrapped in a protective material such as burlap. |
Well-developed root systems increase chances of survival on site |
Expensive |
Provide shade and earlier establishment of upper canopy on site |
Large and heavy to transport |
|
Bare-root The plant is sold without any soil around its roots. |
Less expensive |
Requires care not to let root systems dry out before planting. |
Easier to transport to site; lightweight to carry around for planting |
Difficult to establish in dry sites or sites with warm, sunny spring seasons. |
|
Roots have not been restricted by containers |
||
Container The plant is sold in a container of potting media or soil with drainage holes. Sizes and shapes or containers range from very small to very large. |
Well-established root systems with intact soil |
Native soil not used in nursery; transplant shock may occur when roots try to move into native soil |
Provide "instant" plants on site |
Can be expensive |
|
Available in a variety of sizes; many are available year-round |
Can be difficult to transport to and around site if large numbers are used |
|
Can be planted all year long |
Can be difficult to provide irrigation until established; may actually require more maintenance than plug |
|
Liners/Plugs A small plant, rooted cutting, or seedling that is ready for transplanting. They are often used for herbaceous plants and grasses. |
Well-established root systems with intact soil. |
Same as above |
Easy to transplant; plant material pops out of containers easily |
Smaller plants may take longer to establish; require more initial maintenance |
|
Cuttings A piece of branch, root, or leaf that is separated from a host plant and used to create a new plant. These may be placed in a rooting medium or stuck directly into the ground for planting. |
Inexpensive to produce; cutting may easily be taken on site or from nearby site |
No established root systems |
Easy and light to transport; known to work well in rocky areas or areas difficult to access |
Timing of taking cuttings and planting them is important; varies among species and limited to dormant periods |
|
Salvage Native plants that are removed from a site (to a nursery, storage area, or directly to another field location) before ground disturbance at that site occurs. (Can also refer to salvaged cuttings or seed sources.) |
Can use plant material that would otherwise be destroyed |
Different native plants respond differently to being dug up; some loss could be expected |
Plant material could be local to site |
Requires fairly intensive measures to protect plants and ensure they have adequate irrigation |
|
Relatively inexpensive |
||
Small or young salvage plants often adapt more readily to transplant than do mature specimens |
Adapted from Dorner 2002
Potential disease and insect issues
Diseases can affect all native plant species used in revegetation, but assessing and mitigating for individual diseases is at times overlooked during revegetation projects. If a disease occurs, many times it is the result of trying to establish plant species in the wrong environment. For instance, species adapted to dry environments may be susceptible to certain diseases if planted in wet soils where a different set of root and other pathogens are present. While pathogens might be present on a site, this does not necessarily mean that plants will be affected. Much like humans, plants are always surrounded by a variety of pathogens, but it is not until they experience stress that they become more susceptible to diseases.
For the Designer
Consult pathologists at extension offices, universities, or other agencies for expert input on disease issues.
For the Designer
To prevent disease spread to native populations, designers should only work with nurseries that have practices to ensure only disease-free nursery stock is out-planted.
Planting appropriate species matched to sites where they have adapted to, using genetically appropriate stock, purchasing high quality plant materials from nurseries with good disease and insect management practices, improving the soil, and mitigating for climate extremes all play an essential role in creating healthy plants capable of resisting diseases or insect pests. If diseases are found on seedlings after planting, they may have previously become infected at the nursery. Appropriate sanitation procedures and practices a nursery might employ to help mitigate the risk of diseases include using only clean containers and potting media, starting with disease-free stock, and using only clean (non-recycled water). For more information on nursery practices that help prevent the spread of diseases or insect pests, the designer can find example guidelines in the Native Revegetation Resource Library. There have been some cases when diseases originating in the nursery can spread to native plant populations with devastating effects. The recent spread of Phytophthora ramorum (the water mold pathogen that causes Sudden Oak Death, aka SOD) in California, Oregon and elsewhere serves as a dramatic example of the problems faced when pathogens are released into the landscape (www.calphytos.org). Avoiding the purchase of damaged and infested stock and purchasing from growers that use best management practices can greatly reduce the risk of spreading diseases or insects.
For the Designer
Designers should consult entomologists at extension offices, universities, or other agencies for expert input on insect issues.
A variety of insects can damage newly planted seedlings, as discussed briefly in this section. Because this is a specialized field, the designer is advised to consult technical or academic experts if insect problems are extensive on a revegetation project. Insect damage is grouped into four classes (Helgerson and others 1992), based on where insect feeding occurs:
- Sap-suckers—foliage
- Root beetles—root system
- Terminal feeders—terminal shoots
- Secondary bark beetles—stems
It may be difficult during the planning stages to determine if insects will be a limiting factor. However, designers can consult with entomologists to determine which insects might be known species of concern. Damage to seedlings by insects may be often overlooked because the injury usually occurs before the seedling shows visible signs of stress. By this time, the insect is no longer present, leaving only signs of previous activity. When dead or dying seedlings are discovered, it is important to systematically evaluate the seedling from the root system to the terminal bud for the presence of insects, insect damage, and diseases (discussed in the following section). If insects are found, individuals should be collected for later identification. Designers can place insects in small glass or plastic containers until they can be examined by an entomologist. It is important to look under the leaves for aphids and scrape the entire seedling with a sharp knife to observe boring and tunneling. Damage caused by insects and diseases can occur under the bark of the stems and roots themselves. A hand lens is helpful when evaluating damage. The following discusses some of the most prominent insects that damage conifer seedlings. Non-conifer species will have their own unique associated pests. Nevertheless, classifying the insect into one of the four classes is a start in making a diagnosis.
- Sap-Suckers—Sap-suckers include the Cooley spruce gall adelgid (Adelges cooleyi) and the giant conifer aphids (Cinara spp.) that feed on succulent foliage of tree seedlings. While these can cause shoot deformity and foliage loss, aphids will normally not kill seedlings. The appearance of aphid ants (which cultivate aphid populations) on the leaves are indications that aphids are present.
- Root Beetles—The root bark beetles (Hylastes spp.) and root-collar weevil (Steremnius carinatus) girdle the roots and stems of conifer seedlings and will weaken or kill newly planted seedlings. The damage can be mistaken for herbivory by small mammals, but the lack of teeth marks and the below-ground location of the damage are indications that the damage is caused by root beetles.
- Terminal Feeders—The larvae of this group of insects feed on the terminal shoots of young conifers, killing much of the new growth. Continued annual attack by these insects can severely stunt conifer seedlings. The major insects include white pine weevil (Pissodes strobi [Peck]), ponderosa pine tip moth (Rhyacionia zozana), western pine shoot borer (Eucosma sonomana), and the cone worm (Dioryctria spp.).
- Secondary Bark Beetles—The Douglas-fir engraver beetle (Scolytus unispinosus) attacks the stems of stressed seedlings, creating galleries under the bark that weaken or kill Douglas-fir seedlings.
Some examples of ways to mitigate for insects include:
- Plant a Variety of Species—Insects are often host-specific, meaning they attack only one species. For this reason, a preventative measure is to plant a variety of species. If an insect infestation occurs, it may not affect all the seedlings planted.
- Plant Healthy Stock—Insects often attack weakened seedlings or seedlings that are stressed. Planting only healthy and vigorous seedlings, appropriate to the site, reduces the potential damage by insects.
- Create a Healthy Soil Environment—Seedlings grown on poor sites, or on sites outside of the species' environmental ranges, will be stressed and become susceptible to insect damage. Planting seedlings on optimal growing sites will produce healthy seedlings resistant to insect damage. Judicious use of fertilizers (that is, avoid over-fertilization) is also important for pest prevention. For example, sucking insects often attack plants that have been over-fertilized with nitrogen.
- Install Bud Caps—Some terminal feeders can be controlled through the use of bud caps that are placed over the terminal in the spring prior to shoot growth (Goheen 2005). Bud caps are materials made out of paper or fine cloth that temporarily cover the terminal and prevent adult insects from laying eggs on the bud.
For any stocktype, various desired characteristics should be defined, including age, size, likelihood of survival on the site, ability to compete with other vegetation and/or tolerate animal effects, and methods that will be necessary to out-plant and maintain the stocktype. For bareroot stocktypes, size, age, and potential survival rates should be considered. For cuttings, consider if the project requires containerized cuttings (with a root system in a container), heeled or bareroot cuttings (with roots but no container), or simply cuttings to stick directly in the ground on the project site. For cuttings, length, caliper, and conditions of storage are also important factors. For container plants, no standard terminology exists for describing the different types of container plants available (Landis and others 1992). They are usually described by their container type, referring to the volume and usually the shape of the container. Size and age of the plant are also described. When ordering container plants, consider age, caliper, height, and root size and depth, as well as any other special characteristics that might help the plant survive on the project site (Table 3-15).
Salvaging plants from the project area can be an important component of protecting native plant diversity on the project site. Sometimes salvaged plants are simply relocated instantly from one area to another. Other times, they may be transplanted or moved to a nursery area, cared for, and then re-planted at an appropriate time. As much native soil as possible is included when digging the salvaged plants, as this soil not only supports the health of the plants but also contains the native seedbank and root fragments of it and adjacent plants. "Salvage" may also involve harvesting cuttings or seeds from plants that are going to be removed during the road construction process.
Depending on the species, genetics, site limiting factors, and specific project objectives, some concept of the appropriate "target" stocktypes will already be defined. For example, some plants respond well to certain propagation methods; some will be salvaged ("wildings") from the site; and some are obvious candidates for direct seedling applications in order to facilitate fast regeneration. The needs and characteristics of a particular species will help determine if direct seeding, nursery propagation, or other methods are the more appropriate strategy. Many options can be considered, some of which are summarized in Table 3-16.
Table 3-16 | Comparison of different plant establishment methods
Characteristic |
Wild |
Cuttings |
Seeds |
Nursery plants |
Efficient use of seeds and cuttings |
N/A |
No |
No |
Yes |
Cost of establishment |
High |
Moderate |
Low |
Moderate |
Ability to establish difficult species |
Yes |
No |
No |
Yes |
Option of using specific genotypes |
No |
No |
Yes |
Yes |
Precise scheduling of plant establishment |
Yes |
Yes |
No |
Yes |
Control of stand composition and density |
Yes |
Yes |
No |
Yes |
Matching stocktypes to site conditions |
No |
No |
No |
Yes |
Depletion of adjacent plant stands |
Yes |
Yes |
No |
No |
For the Designer
Quality plant and seed availability at your desired planting time depends on early identification of plant material needs and purchase coordination with the Client and Contractor.
Scheduling
Timing is a key factor for obtaining plant materials because many native plants or seeds are not widely available from nurseries and seed companies. Even if a species is available, the odds are that it is not from a local source that is genetically adapted to the project site. Therefore, it is essential to identify plant material needs early. It usually takes a lead time of two to four years to administer seed collection, seed increase, and seedling propagation contracts. Sometimes three years may be required to achieve sufficient quantities of seeds. Plants (seedlings, cuttings, and so on) ordered from nurseries take a great deal of advanced planning for both seed collection and for plant propagation. Failure to realize the lead time necessary for seed collection and propagation of appropriate native plant materials is one of the most common mistakes made in revegetation projects Figure 3-97.
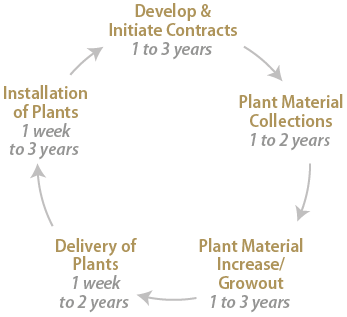
Figure 3-97 | Early planning for plant material procurement
Early planning for plant material procurement is essential. Depending on plant species, stocktype, and quantity desired it can take up to three years or more to obtain sufficient plant material. Due to the biology of plants, a missed window of collection may result in a full year's delay. Outplanting may occur across multiple growing seasons, requiring several delivery and installation events spanning a timeframe of years.
Select Installation and Maintenance Methods
Many methods are available for installing plant materials on a project site. Seeds can be applied through hydroseeding equipment, disked or drilled into the soil surface, broadcast sown, imprinted, and/or covered with a variety of types of mulch. A variety of techniques are also available for installing cuttings and plants, including an expandable stinger Figure 5-118, waterjet stinger, pot planter, auger, and a shovel. These methods are discussed in Chapter 5.
After plant materials, have been installed, care is required until they are well-established. This includes protection from browsing animals, high temperatures, winds, competing vegetation, and drought. Measures that can mitigate for browsing animals include installing netting and tree shelters, over-planting to compensate for expected browse, as well as applying animal repellents. If netting or tree shelters are used, it is important to account for their removal in the implementation budget and contract. Seedlings can be protected from high temperatures and wind with shade cards, tree shelters, and large obstacles, such as logs. Competing vegetation is controlled through weeding, mulch, or herbicides. In extremely dry conditions, soil moisture can be supplemented by using irrigation systems.
3.14.2 Determine Outplanting Windows
In addition to ensuring enough lead time to successfully carry out native revegetation goals, the optimum seasons for planting must be determined. There are advantages and disadvantages to carrying out operations at any time of the year, and determining the timeframe should be based on the species, plant material, and site factors.
The optimum time of year to outplant for greatest plant survival is called the outplanting window. It is determined by graphing the annual precipitation, temperatures, and snow accumulation of a site. This information can be obtained from climate stations, as described in Phase One. Outplanting windows are also defined by the species, stocktype, and outplanting methods. For example, two different species of bunch grass might have very different survival rates depending on when they were outplanted. Figure 3-98 shows survival rates for bluebunch wheatgrass (Pseudoroegneria spicata), that survived better when planted in fall, and spreading needlegrass (Achnatherum richardsonii), that survived better when planted in spring.

Figure 3-98 | Survivorship can vary between spring and fall plantings
Outplanting must be timed properly for best results given site conditions and species requirements
Reproduced from Page and Bork 2005
Several factors are important for determining outplanting windows, including soil temperatures in late winter and early spring, precipitation during spring and early summer, soil temperatures in fall, precipitation in fall, and snow cover. Three examples of identifying outplanting windows are provided in Figure 3-99, Figure 3-100, and Figure 3-102. Applying the following set of guidelines to the climate data will help clarify the optimum times to plant.
Soil Temperatures in Late Winter and Spring
Seedlings must develop new roots soon after they are planted to become established and survive the hot (and in many regions, dry) summer of the first growing season. For most species, new root growth occurs when soil temperatures exceed 42° F. Waiting for soil temperatures to warm to 42° F in the spring before outplanting, however, will shorten the period when soil moisture is available to the seedling. For this reason, a common restoration strategy is to outplant seedlings as soon after the last threat of a deep frost in the winter has passed, even if the soil temperatures are below 42° F.
Precipitation in Spring and Summer
Much of the western United States experiences dry summers, with winters receiving most of the precipitation. Under this regime, soils lose their moisture in the summer and recharge from storms that occur in the fall and winter. Plants have adapted to this climate by growing new roots and leaves during spring, when soil moisture is high, and becoming dormant in summer, when soil moisture is depleted.
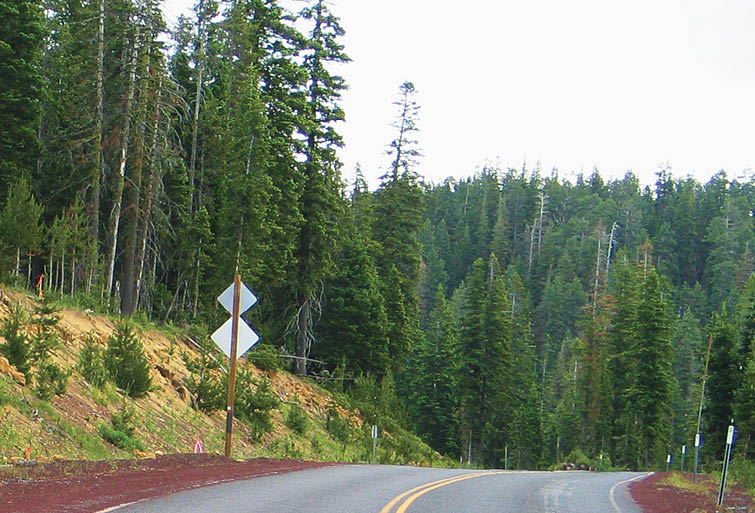
The most critical factor for seedlings that are outplanted in the spring is the length of time available for the seedling to develop new roots before soil moisture is depleted. Sites with little or no precipitation in the spring or summer will dry out faster than sites with high spring and summer precipitation. A guideline is that an average monthly precipitation of less than 1.5 inches will do little to recharge a dry soil during late spring through fall. Figure 3-99, Figure 3-100, and Figure 3-101 show spring outplanting windows for three very different project sites. On low elevation sites west of the Cascade Mountains, the planting window can be fall and spring (Figure 3-99), whereas high elevation sites might have a planting window only in late spring (Figure 3-101).
Figure 3-99 | Case study—Low elevation, Western Cascade site
The project site is located near Tiller, Oregon, where winters are wet and relatively mild, and summers are dry and hot. North slopes support Douglas-fir, incense cedar, and madrone. South slopes support ponderosa pine, oaks, and grasses. During summer, strong drying winds blow up the valley in the afternoon. Weather station records, from a U.S. Regional Climate Station located several miles away, show daily maximum summer temperatures in July and August averaging 84° F.
The site has two planting windows. The spring planting window starts after the risk of the last winter cold front in mid-February has passed and ends two months before monthly precipitation dips below 1.5 inches. The fall planting window begins as soon as the first fall rains wet the soil profile and ends one month prior to soil temperatures dropping below 42° F.
Long dry summers, coupled with high temperatures and strong winds, create challenges to establishing seedlings. Outplanting in the fall or in mid to late winter is essential in order to develop new roots. Removing grass and other vegetation from around the seedling and applying a mulch fabric in March increases soil moisture. In places, tree shelters and shade cards placed around seedlings can protect them from the drying effects of the afternoon wind.
Hydroseeding in October with mulch and tackifier will keep seeds in place long enough to germinate in November. Complete seedling establishment will occur by the following April.
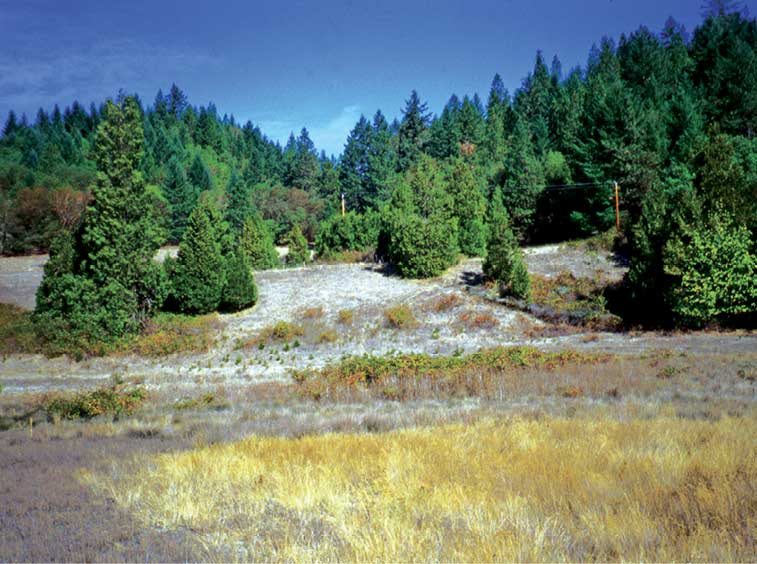
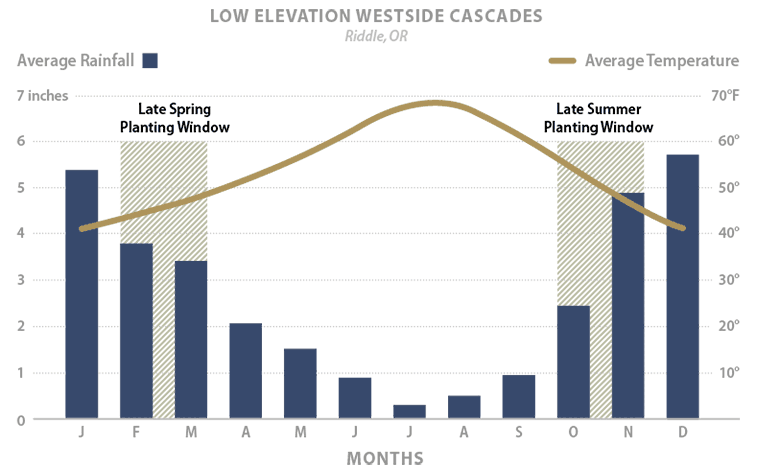
Figure 3-100 | Case study—Cool, arid site
The climate at this project site is typified by dry, mild summers and cold winters with a snow pack extending from late fall to late winter. (Climate data was from a weather station located near the town of Chiloquin, Oregon.) Ponderosa pine, quaking aspen, and bitterbrush are the dominant vegetation on the site. The planting window begins immediately after snowmelt. Precipitation drops off significantly in April and May. Planting must be completed no later than the first week of April when monthly precipitation drops below 1.5 inches. Note that soil temperatures during the recommended planting windows are cooler than 42° F. Nevertheless, it is more important to plant early on arid sites than wait until soil temperatures warm. Rainstorms in the fall do not deliver enough moisture to recharge the soil before mean fall temperatures drop below 42° F. Early planting can take place in the fall if seedlings are irrigated at the time of planting. Seedlings on south slopes should be mulched to conserve soil moisture, while seedlings on cooler north aspects would benefit from, but may not require, mulch.
Grass and forb seeding in September and October is essential because most seeds from this area require a stratification period. Seeds will not germinate in the fall because of the lack of continuous fall moisture and low temperatures. Germination occurs immediately after snowmelt in the spring. Seed germination can be poor because the soil surface dries out quickly due to low humidity, high solar radiation, and low precipitation. Mulching the seedbed with ground wood fiber or straw will maintain high humidity around germinating seeds. Spring seeding can be successful if seeds are soaked for several days prior to seeding and if seeding is done as soon as snows have melted.
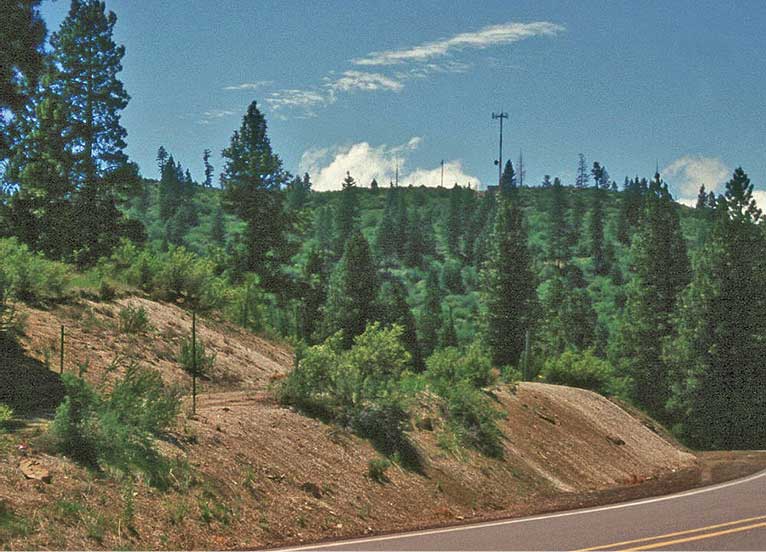
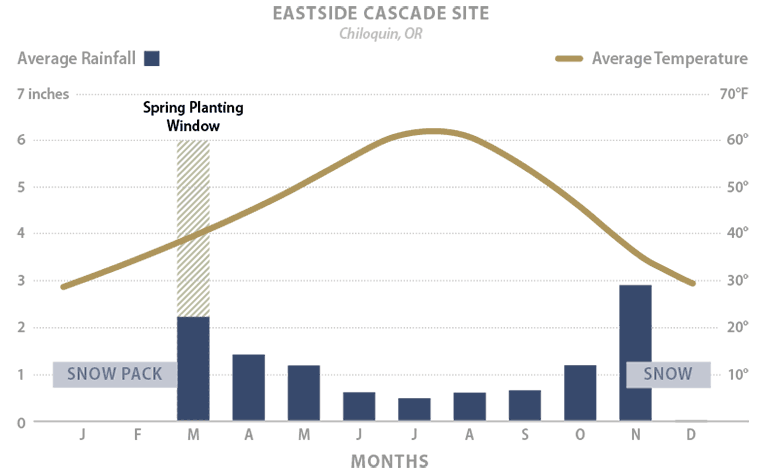
Figure 3-101 | Case study—High elevation site
This site is located in the high Cascade Mountains at 4,800 feet elevation. Mixed stands of mountain hemlock and noble fir occupy the site. Snowpack begins in November and is present on the site until May. Seedlings must be planted as soon as the snow leaves the site. Thunderstorms will typically wet the soil by late summer, opening a second planting window sometimes as early as late August. Competing vegetation must be controlled around container seedlings planted at this time to maintain high soil moisture for the remainder of the fall. Scalping vegetation immediately after planting and applying a mulch will help maintain high soil moisture. As temperatures begin to drop in late summer, evaporative demands on the planted seedlings are reduced. Planting must be completed by late September to ensure that seedlings will have some time to develop new roots. North aspects will have cooler soil temperatures and should be planted sooner than south aspects.
Weather station data indicate average minimum air temperatures are cold during the growing season. Applying tree shelters around seedlings will increase daily air temperatures, creating a more favorable environment for seedling growth. North aspect seedling plantings might benefit more from tree shelters than south aspect plantings.
Sowing can take place in the late spring, immediately after snowmelt, and again in the fall. Late spring sowing will be significantly enhanced by applying mulch over the seedbed and/or pre-germinating seed prior to sowing. Seeds of species that do not require stratification should germinate within a month after sowing in late spring. Species requiring stratification should be sown in the fall.

Soil Temperatures in Fall
If outplanting is planned for late summer or early fall, it is important that soils have high moisture and temperatures are warm enough to encourage new roots to grow into the soil before winter arrives. On cold sites where seedlings are not protected by snow, the upper portions of the soil profile will typically freeze (e.g., frost heave) and can dislodge seeds or seedlings exposing roots to desiccation. Fall outplanted seedlings that have not established new roots below the frost line risk desiccation by wind or sun exposure in winter because little to no water is available to the seedling. For greatest success, soil temperatures should remain above 42° F for at least one month after seedlings are planted in the fall for root development and seedling establishment prior to winter. Figure 3-101 shows a late summer planting window on a high elevation site where precipitation is high in September and soil temperatures are above 42° F.
Soil temperatures are significantly warmer on south aspects, which means that outplanting windows on south exposures are often temporally broad and extend further into the fall than planting sites on north aspects, given soil moisture is adequate for root growth. Weather stations do not report soil temperatures. However, they can be extrapolated from average monthly air temperatures with a certain degree of reliability. Placing recording thermometers in the soil before construction will give more exact soil temperatures.
Precipitation in Fall
When outplanting seedlings in the fall, high soil moisture is essential for seedling survival and growth. Fall soil moisture can be very low, and the only means of recharging a dry soil is through rainstorms or irrigation. Two or more inches of rain over a period of at least several days are often required to moisten most dry soils. Many sites in the western United States, however, seldom have rainstorm events great enough to moisten the top 12 inches of soil before cold soil temperatures occur. Fall planting on these sites has a low potential for seedling survival. On sites with sufficient fall precipitation, planting windows are open as soon as a rainstorm event wets the surface 12 inches of soil.
Snow Cover
Seedlings should not be planted through snow, so outplanting windows are open before snow accumulation and after snowmelt. Be aware, however, that cold water from melting snow keeps soil temperatures low. Soil temperatures should be monitored during or following snowmelt.
Determine Sowing Windows
The outplanting windows for seed sowing may be different than those for planting nursery stock. Optimum planting times for seeds are called "sowing windows." Sowing windows change by site environment, sowing methods, and seed needs. Seeds will germinate and develop into healthy, viable plants when: seed stratification requirements are met and seeds are in a warm, moist environment during germination. Seed stratification requires a cold, moist period, ranging from a few weeks to several months, during which time the seeds are conditioned for germination. This usually occurs naturally in the western United States during early to mid-spring, but it can be induced artificially in seed coolers.
After seed stratification requirements, have been met, a moist, warm period must follow in which seeds and soil do not appreciably dry down. Drying during this time can prevent germination and kill new germinants. In the western United States, these conditions are best met by sowing seeds in late summer to early fall. On warm, moist sites (Figure 3-99), seeds that require a very short stratification period will germinate in early fall and begin to establish ground cover before winter rains occur. Fall-sown seeds requiring stratification will have moisture and temperature requirements met during winter. On drier sites (Figure 3-100), fall-sown seeds will not germinate due to lack of precipitation.
If fall sowing is not possible, sowing can take place in late winter or early spring. Sowing at this time generally results in less vigorous stands of grass and forb seedlings because there is a shorter period of favorable conditions for seeds to germinate and seedlings to become established. Another drawback of spring sowing is that some species will not receive the required cold, moist period to break seed dormancy and germinate. Once germination has occurred, several months of periodic precipitation with average air temperatures exceeding 40° F are required for successful establishment of ground cover.
Spring sowing can be enhanced in several ways. A mulch applied over the seeds will help maintain higher seed moisture levels and keep soil moisture in the soil for a longer period. Seeds requiring stratification can be artificially stratified for spring sowing to achieve earlier germination. Care must be taken that the seeds do not mold or begin to germinate during this period, or dry down for sowing. The effect of hydromulch equipment on germinating native species seeds is unknown at this time; seeds may be damaged if sown using this method.