ROADSIDE REVEGETATION
An Integrated Approach to Establishing Native Plants and Pollinator Habitat

5.5 Post-Installation Care of Plant Materials
The first year after plant materials are installed on a project site is typically the most critical period in a revegetation project because this is when plants become established. Applying the appropriate mitigation measures to improve the site and soil conditions prior to installation of plant materials greatly increases the chances of plant establishment. Sometimes even these measures are not enough to overcome limiting site factors. The implementation guides in this section cover several post-installation measures that can be conducted to increase the potential of plant establishment.
Establishing plants from nursery stock is often limited by animal browsing. Section 5.5.2 covers the methods available for protecting plants from different forms of animal damage. On hot, dry sites, plants need to be shaded from mid- to late afternoon solar radiation. The application of shade cards (Section 5.5.3) is one method for protecting young plants from heat stresses. Moderating the climate around plants from extreme temperatures and high evapotranspiration rates is sometimes accomplished through the use of tree shelters. Section 5.5.4 outlines when these structures are used, product types, and how they are applied. Some projects require supplemental irrigation for establishing seedlings on extremely dry sites. Section 5.5.5 discusses two types of irrigation used in revegetation projects: deep pot irrigation and drip irrigation.
5.5.1 Introduction
The first several years after the installation of seedlings are critical for the survival of healthy nursery plants. In the western United States, nursery plants die because of animal damage, high surface temperatures, high evapotranspiration rates, lack of soil moisture, and vegetative competition. This section describes certain steps to reduce these impacts. Where animal browsing is high, fencing, netting, and animal repellants are important to consider (Section 5.5.2). For high surface soil temperatures shade cards can be used to protect seedlings (Section 5.5.3). Reducing evapotranspiration rates is achieved using tree shelters (Section 5.5.4) and shade cards. Some high visibility projects require fast growth rates and low risk in plant establishment, in which case irrigation can be considered (Section 5.5.5). Additional measures that benefit seedling survival are covered in other sections. These include applying fertilizer, mulches, and beneficial organisms (Section 5.2.1, Section 5.2.3, and Section 5.2.7).
5.5.2 Animal Protection
Planted seedlings can be damaged by a variety of animals, including cattle, deer, elk, gophers, and voles. While some damage by animals can be expected, excessive damage should be prevented. A variety of methods can be used to protect seedlings, including rigid and non-rigid netting, fencing, and animal repellents.
Netting
A common practice for protecting seedlings from browsing animals is to install a plastic netting over each seedling. The netting acts as a barrier to foraging of foliage, stems, and even root systems without impeding plant growth. It has been used to protect seedlings from deer, elk, gophers, and other ground-burrowing animals.
The two general types of netting are rigid and non-rigid. Non-rigid netting is a soft, fine-mesh plastic material. When installed on a seedling, it fits snuggly around the foliage like a sock. The rigid netting (Figure 5-125) has larger mesh openings and holds its form when installed. Rigid netting, while typically more expensive, is usually preferred over non-rigid because it is easier to install and seedling growth inside the netting is less restricted.
Netting should be installed as soon after planting as possible to ensure immediate protection. If installation occurs after bud break, care should be taken not to break or damage the terminal leaders or buds. Rigid netting is held in place with one or two bamboo stakes woven through the netting at three places and driven into the soil at a minimum depth of 8 inches. For deer and elk protection, netting is placed so the height of the netting is several inches or more above the terminal bud. Non-rigid netting is simply placed over the foliage like a sock and not secured with stakes. Rigid netting can offer some protection from gopher damage if the netting is installed more than several inches below the surface of the soil (Figure 5-125).
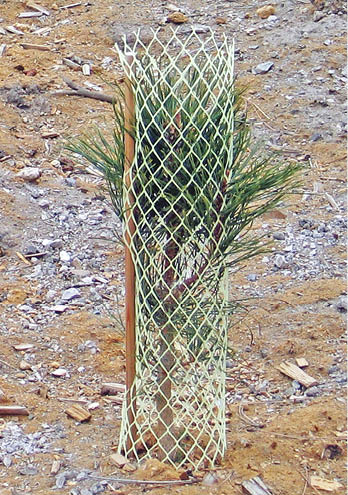
Figure 5-125 | Rigid netting
Rigid netting can protect seedlings from deer, elk, and gopher damage. The netting in this picture was installed 3 inches below the ground line to protect the seedling from gophers while the foliage and terminal leader are protected from deer and elk browsing.
Photo credit: David Steinfeld
The effectiveness of netting decreases as the terminal leader grows out of the rigid netting and become susceptible to browsing. At this point, the netting can be repositioned upward to protect the terminal leader, which requires annual maintenance. At some point, netting should be removed entirely to avoid restricting seedling growth and ultimately killing the seedling. Some netting has been manufactured with photodegradable material that will break down within several years, eliminating the need for removal. Nevertheless, sites that have had any type of plastic netting installed on seedlings should be visited several years after planting to determine whether the plastic netting is degrading or needs to be removed.
Fencing
Fencing is often used to protect planted or seeded areas from wild ungulate and livestock grazing or trampling. Each group of animals requires different fencing specifications. Fence height for wild ungulates requires 8 to 12 feet (Helgerson and others 1992), while fence height for livestock is 4 to 5 feet. Fences should be installed prior to seeding or planting to ensure optimal plant establishment.
Fencing entire planting or seeding areas is expensive to install and maintain. Maintenance should be given high priority because one break or opening in the fence will place the entire project at risk. It is recommended that fences be monitored and maintained at least weekly and up to three times per week during peak browse season (Greaves and others 1978). Fences can be designed with one or more gates to allow domestic or wild ungulates or other species to escape if they become trapped.
An alternative to fencing entire planting areas is to fence strategically located areas, such as planting islands. Fenced areas, called exclosures, range in diameter from 6 to 15 feet and are typically constructed with a 14-gauge, galvanized welded wire mesh (2- by 4-inch openings). Fence heights can be reduced around small diameter exclosures because wild ungulates are less likely to jump into small areas (Gobar 2006). In this strategy, the smaller size and greater number of exclosures reduce the risk of a failed project. After seedlings have grown high enough to withstand grazing and browsing pressures, small enclosures should be removed.
Animal Repellent
Browsing by deer and elk can be temporarily controlled by applying animal repellents to the foliage of seedlings. A variety of repellents are on the market with varying degrees of effectiveness. Trent and others (2001) tested 20 products for effectiveness in reducing deer browse on western red cedar (Thuja plicata) seedlings and found that products emitting sulfurous odors were the most effective. These products contain active ingredients such as "putrescent whole egg solids" or "meat meal." Less effective products were those causing pain or irritation, containing active ingredients such as capsaicin, garlic, and dlimonene. Of the products tested, the least effective repellents protected seedlings for a few weeks, while the most effective protected seedlings for up to three months. Because seedlings are generally more palatable after winter dormancy, deer repellents should be applied just before bud break (Helgerson and others 1992) and at several month intervals during the active growing period as needed. Animal repellents in a hydrophilic powder formulation are reported to adhere better and last longer in climates with high rainfall than liquid forms (Helgerson and others 1992). Additionally dyes can be incorporated to indicate the presence of these repellents which be useful to monitor application patterns.
5.5.3 Shade Cards
Because high soil surface temperatures can limit seedling survival and growth, it is important that the stem of the seedling (where heat buildup occurs and causes the most damage) is shaded from the sun (Childs and Flint 1987). Seedlings can be planted next to obstructions, such as logs, to utilize the shade these structures provide. Unless the placement of obstacles is planned into the project, construction sites will usually be free of material large enough to cast shadows. An alternative, but less effective, method of creating shade is using shade cards. Shade cards are small, easy-to-install structures that shade the lower portions of the seedling from surface soil temperatures (Figure 5-126). Tesch and Helms (1992) reviewed numerous studies that evaluated the effects of shade cards on planted seedlings and found that, while the use of shade cards can significantly improve seedling survival, they should only be considered on sites where several revegetation conditions are suboptimal, including south-facing aspects, sites with high winds, or when planting small, poor quality stock.
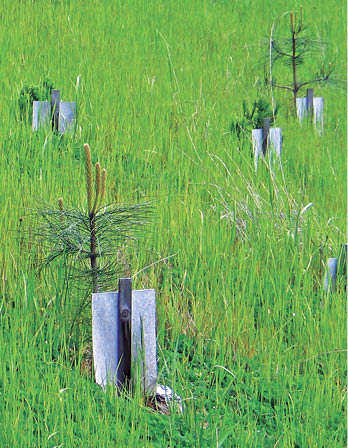
Figure 5-126 | Shade cards
Shade cards are placed on the south side of the seedling so the shadow cast by the shelter protects the lower portion of the seedling. This photo was taken two years after shade card placement.
Photo credit: David Steinfeld
To be effective, shade cards should be installed in the spring after planting and before hot weather sets in. It is important to know where the shadow of the installed shade card will be cast in order to know where to place the card. The shadow should cast shade on the stem and lower portions of the seedling to protect these areas from high surface temperatures during the hottest portion of the day (Childs and Flint 1987). The length of the shadow is dependent on the longitude, date, time of day, slope angle, and height of the shade card. Improper installation of shade cards is a common mistake, which typically occurs when cards are placed on the wrong side of the seedling. Card installers should be aware of the cardinal directions at all times during the day, which can be difficult on cloudy days. For this reason, contractors and inspectors should use a compass when installing cards and inspecting contracts. Another common mistake is not placing the shade card close enough to shade the base of the seedling during the hottest time of the day. Shade cards are also used to protect seedlings from strong, drying winds that create high moisture stress for establishing seedlings. Typically, shade cards are placed on the windward side of the seedling to deflect the wind. It is important to know the direction of the strongest or hottest wind in order to properly install the shade cards. For example, on a site with strong, drying winds coming up-valley in the afternoon, two shade cards would be installed at a 90-degree angle to each other on the down-valley side to enclose the seedling.
Shade cards are made from shingles, cardboard, tarpaper, and polypropylene mesh. Selecting the appropriate shade card for the site can be based on how easy the shade card is to install, the weight, dimensions, life span, and costs. Drawbacks to the use of shade cards are the visual impact on the site and the fact that they should be removed after several years.
5.5.4 Tree Shelters
Tree shelters are translucent plastic tubes that are placed around seedlings after planting (Figure 5-127). They benefit seedling establishment by creating a favorable growing environment while shielding the seedling against animal damage. Tree shelters enhance plant growth by creating a microclimate similar to a mini-greenhouse, which has lower light intensities, higher temperatures, and higher relative humidities (Applegate and Bragg 1989; Jacobs and Steinbeck 2001). On high elevation sites, tree shelters increase above-ground temperatures and extend the growing season (Jacobs and Steinbeck 2001). Seedling survival and growth are enhanced by tree shelters on some sites because increased condensation on the inner shelter walls during the evening drips into the soil and increases soil moisture (Bergez and Cupraz 1997). On windy sites, tree shelters protect seedlings from wind damage and blowing sands (Bainbridge 1994). In addition, tree shelters protect seedlings from large game, gophers, rabbits, voles, and grasshoppers (Tuley 1985; McCreary and Tecklin 1997; Jacobs and Steinbeck 2001).
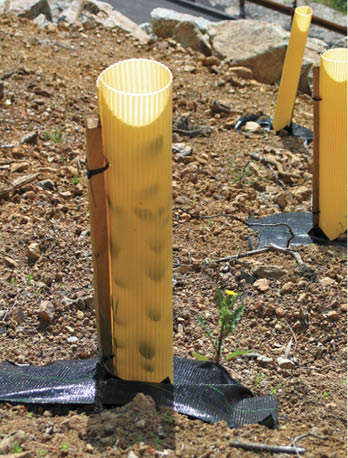
Figure 5-127 | Corrugated plastic tree shelter
Corrugated plastic tree shelters create a microclimate around seedlings to enhance moisture and temperatures for seedling growth. In addition, they protect plants from animal browsing.
Photo credit: David Steinfeld
Where to Use—Tree shelters can be considered for sites where the potential for animal damage is extreme and seedling survival and rapid seedling growth are essential. These sites include, but are not limited to, sites with the following characteristics:
- Gopher or vole damage
- High elevation
- High winds
- Hot and dry
- High solar intensity
- Low water-holding capacity soils
- "One-shot" planting
Drawbacks—Tree shelters are not intended for all species or site conditions. Several studies have shown that, under certain climates, seedlings grown in tree shelters are more susceptible to low temperature extremes than those grown in the open (Svihra and others 1993; Kjelgren and others 1997). These conditions occur in the late winter and early spring on some sites when warmer daily temperatures in tree shelters induce earlier bud break and stem dehardening, leaving seedlings more susceptible to cold temperatures. Air temperatures can also be colder at night in tree shelters on some sites because tree shelters can potentially trap cold air near the ground surface (Swistock and others 1999). On the opposite extreme, extremely high temperatures in the summer can be reached inside the shelters during mid-day, which might be detrimental to seedling growth. For these reasons, installing tree shelters should be done with some understanding of the effects that the shelters will have on each species to be planted and the climate of the site. Small trials, prior to installation, can point out potential problems.
In visually sensitive areas, tree shelters do not blend well with natural backgrounds. Depending on the species and the site, tree shelters might have to remain around plants for up to five years. In addition, long-range planning for shelter removal is critical; without removal, the stem of the plant can be restricted.
Installation—Installing tree shelters may be done during or immediately after planting to protect seedlings from animal damage. Tree shelters are usually delivered in stacks of plastic sheets. They are assembled on site into cylinders that are placed over the seedling and held upright with a stake (Figure 5-127). The stake is driven into the soil so that the bottom of each cylinder is in direct contact with the soil surface. If burrowing animals are a problem, shelters can be installed several inches below the soil surface. This is an effective control of gophers and voles (McCreary and Tecklin 1997; Jacobs and Steinbeck 2001). Netting is sometimes placed over the opening of the shelter to prevent birds and lizards from becoming trapped (Bainbridge 1994). Rigid tubing can be placed over the top of the tree shelter to protect the emerging foliage from eer and elk browse (Figure 5-128). Tall tree shelters require very strong stakes anchored firmly in the soil to withstand strong winds. As the shelters are installed, care should be taken to avoid skinned bark, damaged buds, or broken leaders. Where moisture is a limiting factor, weeding the vegetation from around the shelters is essential. Seedlings competing with weeds are unlikely to take advantage of the water saved by a tree shelter (Bainbridge 1994; McCreary and Tecklin 1997).
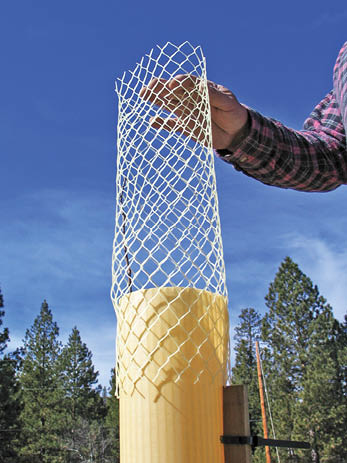
Figure 5-128 | Rigid tubing tree shelter
Rigid tubing can be installed over the top of the tree shelter to protect seedlings from larger browsing animals.
Photo credit: David Steinfeld
Maintenance and Removal—Installed properly, tree shelters require little maintenance. Nevertheless, sites where tree shelters are installed should be inspected annually to assess seedling conditions in the tree shelter and determine if any maintenance is needed. Because yellow jackets and other animals create homes inside tree shelters, it is wise to be cautious when conducting inspections.
Tree shelters create growing conditions that favor seedling height growth over stem diameter growth (Figure 5-129). Because tree shelters physically support the seedlings while they are growing, the seedling directs more of its energy into growing up to the light and less into the stem. Tree shelters should not be removed until a portion of the seedling crown has grown out of the shelter. If the tree shelter is removed while it is still growing inside the shelter, the seedling will not be capable of supporting itself. Once the seedling has emerged from the shelter, stem diameters will continue to increase as the foliage acclimates.
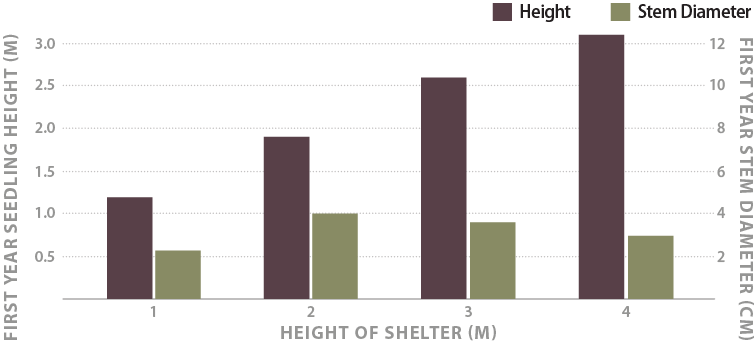
Figure 5-129 | Effects of tree shelters
A study conducted with Australian red cedar (Toona australis) on a warm, moist site in North Queensland showed that, as taller tree shelters are used, first-year shoot growth increases. Stem diameters, however, do not change (Applegate and Bragg 1989).
Available Products—Tree shelters are available in a variety of shapes, sizes, colors, and styles from companies that specialize in reforestation, restoration products, or grape growing.
Color—Color and translucency of the plastic are important characteristics for selecting a tree shelter. Brown-colored tree shelters greatly reduce solar radiation and, in one study on a high elevation site, were shown to drastically decrease seedling survival of Engelmann spruce (Picea engelmannii) (Jacobs and Steinbeck 2001). On hot, dry sites, however, reduced radiation might benefit seedlings. Oak seedlings (Quercus spp.) planted in a semi-arid environment performed best in short, brown-colored shelters because of reduced daily temperatures (Bellot and others 2002).
Lighter-colored tree shelters allow greater solar radiation to reach the seedling but can also heat up when they are exposed to direct sunlight. Highly translucent tree shelters can be considered where light is limiting. Low translucent shelters might be more appropriate for sites where solar radiation and mid-day temperatures are high in order to reduce the potential for overheating.
Material—Tree shelters are made from translucent plastic for light transmission and are built with different degrees of sturdiness. Corrugated tree shelters are the sturdiest and are used on sites with strong winds. Corrugated materials are also used in taller tree shelters for added support (Figure 5-127), and thin plastic can be used in shorter shelters. Tree shelters are typically designed to degrade in five years, but in many cases they do not. Many shelters can therefore be reused, which will reduce project costs.
Ventilation—Without ventilation, tree shelters will build up heat on warm days, especially if they are in direct solar radiation. Maximum daily summer temperature in shelters can be 8 to 16 degrees C (15 to 30 ° F) higher than ambient air temperatures (Steinfeld 2005). Extreme temperatures can be reached on days where ambient air temperatures exceed 38° C (100° F). For these sites, shelters with some form of ventilation, such as holes, should be used. Ventilated tree shelters have been shown to reduce maximum daily shelter temperatures by 3° C (5° F) (Swistock and others 1999). Where ventilation is needed, taller shelters will require more ventilation than shorter shelters.
A ventilated tree shelter may restrict carbon dioxide in the area around the seedlings, which would be a further consideration for ventilation. Some studies have shown that carbon dioxide is very low in shelters (Dupraz and Bergez 1997). However, other studies that have shown higher levels of carbon dioxide within shelters than outside (Frearson and Weiss 1987).
Size—Selecting the size of the shelter should be based on the anticipated growth rates of the species planted and the anticipated animal damage. Shelter heights range from 1 to 9 feet and diameters up to 6 inches. To obtain the greatest benefit from tree shelters, the shelter height should not exceed the maximum seedling growth in the first year. Fast-growing species can have tall shelters; shorter shelters can be used for slow-growing species. Ideally, the shelter height should be greater than the browsing level of the foraging animal. For example, tree shelter heights in deer browse areas should be at least 4 feet tall so that new seedling growth from the top of the tube is not severely browsed back. Extending the protection of the tree shelter can be done by using a rigid netting placed over the top of the shelter. Large shelters can be cut into any height or diameter needed for the project. Very small shelters (less than 6 inches tall) can be used around germinating seeds to protect them from small animals and create a micro-climate for germination (Figure 5-130).
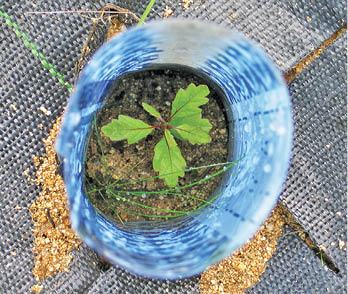
Figure 5-130 | Tree shelters and germinating seeds
Small tree shelters can be placed around germinating seeds to enhance germination and early seedling establishment, as shown in this photograph of an establishing California black oak (Quercus kelloggii) seedling in a tree shelter made out of xray film.
Photo credit: David Steinfeld
Costs—Tree shelters can be an expensive addition to a revegetation project. The high costs to purchase, assemble, install, maintain, and remove shelters should be considered against the benefit of increased survival and growth. On projects where smaller, less expensive seedlings are being planted, the cost savings from not planting larger stock can offset the installation of tree shelters. Assuming that tree shelters increase seedling survival, fewer seedlings would need to be planted, and these savings could offset the costs of installing tree shelters. Where quick establishment of vegetation is the objective, the use of tree shelters should be considered.
5.5.5 Irrigation
A wide range of irrigation methods and techniques are available to the designer, ranging from simple to elaborate, and from modestly priced to costly. Because irrigation is often a very expensive component for most revegetation projects, the decision to irrigate, and subsequently the selection and design, should be integrated into the objectives of the road project during the planning stages. The most common reason for irrigating in the western United States is to aid in seedling survival during the first several growing seasons. Those sites that have low soil water-holding capacities, high evapotranspiration rates, or low summer rainfall meet these criteria. Irrigation is also used when the project objectives call for a quick establishment of vegetation for visual screening, erosion control, or slope stabilization. Roadside irrigation is almost always a temporary measure, often spanning a maximum of three years. Therefore, elaborate or expensive irrigation systems are not often the best choice for these situations. Low-tech systems, requiring minimal maintenance, tend to be more appropriate for wildland restoration.
The challenge in wildland irrigation is the timing and placement of water in the soil. An irrigation system that delivers water when the plant is less likely to need it is wasteful and can be detrimental to the seedling. A system or schedule that applies water when the plant requires it for survival or growth is most cost effective and beneficial for seedling survival and growth.
Developing irrigation schedules based on plant needs is an essential part of using irrigation for establishing plants, and those needs change based on the species being established, nursery stocktype, soils, and climate. Supplemental irrigation strategies are tailored to the vegetation requiring irrigation. For example, during prolonged drought, areas seeded with forbs and grasses may require supplemental surface irrigation whereas tree seedlings may require deep watering. Within a lager revegetation project specific plantings may require supplemental irrigation because of site-specific characteristics such as topography. For example, plantings in fast-draining areas such as ridgelines or wares with shallow soils may require more irrigation than plantings in the bottom of swales were water naturally collects.
For the Designer
Shallow-rooted species such as grasses and forbs require water near the soil surface and irrigation practices should provide water to this shallow area.
Placing the water in the soil profile where it can be directly accessed by much of the root system is critical for efficient use of an irrigation system. Some irrigation systems moisten more of the soil profile than will be accessible by the establishing root system, and water is consequently wasted. Other ineffective systems barely wet the soil surface, leaving the applicator satisfied but the roots without water. The objective of an efficient and effective irrigation system in wildland settings is to deliver only the amount of water needed, when and where it is needed for seedling survival and growth.
Tree and shrub seedlings survive by growing roots down into the soil profile to access moisture at deeper portions of the soil profile than annual grasses and forbs. Deep placement of water for these species is far more important than surface soil moisture. In spite of this, many irrigation systems, such as drip, basin, and overhead sprinklers, deliver water through the surface, wetting soil where it is not needed and encouraging weeds and other competitive plants to establish and thrive. Furthermore, surface irrigation does not always ensure moisture will be evenly delivered to the deeper portions of the soil where the roots of trees and shrubs are growing. Soil structure and texture affect the wetting-front patterns of surface-applied irrigation water. If the soil is compacted, the amount of water that is delivered to the lower rooting zone can be reduced. A better method of water delivery to the root zone of trees and shrubs is to bypass the surface of the soil completely.
For the Designer
Deep-rooted species such as trees and shrubs require water well below the soil surface where the roots are growing. Successful approaches to irrigating these species delivery water deep under the soil surface (see below).
Deep Pot Irrigation
Several irrigation methods have been developed for arid land revegetation that bypass the soil surface and deliver water directly to the root zone. These systems include deep pot, porous hose, and wick irrigation methods (Bainbridge 2006a). Because these systems deliver water directly to the soil profile where roots are actively growing, far less water is required. Deep pot irrigation (Figure 5-131) appears to be the most effective and practical method for irrigating planted seedlings in arid environments (Bainbridge 2006b). This system has been found to be three times more effective at increasing seedling survival than surface irrigation using the same amount of water (Bainbridge and others 2001).
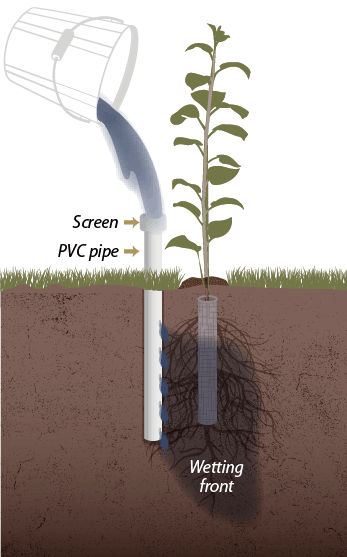
Figure 5-131 | Deep pot irrigation
Deep pot irrigation uses an open ended PVC pipe placed next to a planted seedling. Small holes (1 mm) are drilled 2 to 3 inches down the pipe and positioned toward the root system. A screen is placed over the top of the pipe to keep animals out. The size of the pipe and placement are designed to deliver the appropriate amount of water to actively growing roots (modified after Bainbridge 2006b).
Deep pot irrigation delivers water to the root system through a pipe positioned next to the seedling (Figure 5-131). The pipe is either filled periodically by hand or through an installed drip irrigation system. The soil is moistened as water drains through both the bottom of the PVC pipe and the holes drilled in the sides. The amount of water delivered to the soil depends on the size of the pipe and how much water is applied. Deep pot irrigation pipes are typically made from PVC pipes, although most pipe or tubing material can be used. Pipe diameters range from 0.5 to 3 inches. Pipe lengths range from 8 to 18 inches, depending on the stocktype and water volume to be delivered. A seedling with a short root plug will require a shorter pipe, whereas a longer root plug will require a longer pipe. The bottom of the pipe should be positioned no deeper than the length of the root plug so the wetting front moves around the bottom and lower portions of the plug where it can be accessed by new, advancing roots. The top of the pipe is screened to prevent animal entry and is placed several inches above the level of the soil.
The diameter of the pipe will determine the quantity of water that can be delivered at any one irrigation (Figure 5-132). Given the same pipe lengths, a 2-inch-diameter pipe holds 4 times the amount of water as a 1-inch pipe, and a 3-inch-diameter pipe holds 8 times the amount of water. Because filling pipes is expensive, determining the proper diameter is important. Oversized pipes will deliver a wetting front that extends beyond where it can be accessed by the root system and water will be wasted. Pipes that are too small will not fully wet the area around the advancing rooting zone, requiring more frequent irrigations. Pipe size and irrigation frequencies depend on the factors described below.
Soil Type—Sandy or rocky soils have low water-holding capacities, causing wetting fronts to travel deeper and in a narrower band. Less water but more frequent irrigations are needed in these soils. Pipes should be placed closer to the root plug to ensure the wetting front reaches the root system. Finer textured soils, such as loams and clays, have a higher water-holding capacity and wider wetting fronts. More water can be applied in these soil types and at less frequent intervals than with sandy soils.
Stocktype—Large stocktypes have greater root volumes and greater above-ground vegetation to support than smaller stocktypes; therefore, they require more irrigation water. However, smaller stocktypes could require more frequent irrigation.
Seedling Quality—Healthy seedlings grow new roots quickly and can access deeper soil moisture. Poor quality seedlings are slow to initiate roots and therefore should be irrigated more frequently.
Competing Vegetation—Where undesirable vegetation is growing near planted seedlings, soil moisture is depleted sooner, requiring more frequent irrigation than if seedlings were free from competing vegetation.
Species—Every species has unique rooting patterns, growth rates, and water needs. Those that grow roots quickly and have a higher rate of water withdrawal require larger, deeper pipes and more frequent irrigation. These species include many fast-growing riparian species such as cottonwoods, willows, and maples. For more information, contact the nursery manager growing the species of interest. They are familiar with root growth and water needs by species.
The volume of the pipes and frequency of irrigation will determine the type of water delivery system to use. Sites that need frequent irrigation and high volumes of water per plant could require water delivery through a drip system (Section 5.5.5, see Drip Irrigation). For most projects, however, pipes can be economically watered by hand using backpack spray equipment or fire bladder bags. Bladder bags hold approximately 5 gallons of water and can be filled from water trucks or large water containers positioned in pickup beds. Assuming that an irrigator can carry 20 quarts of water at a time (5 gallons) and each plant in the project requires a quart of water, the applicator could irrigate 20 seedlings before returning for more water. If less water is required, more plants could be irrigated before refilling is necessary.
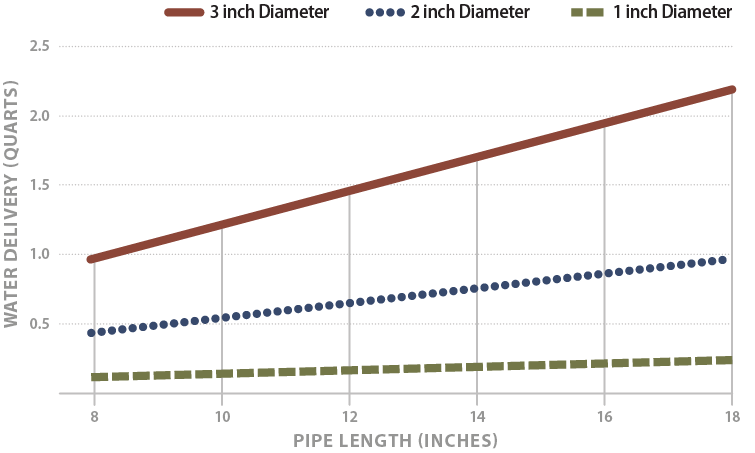
Figure 5-132 | Water delivery
The maximum amount of water that can be delivered to a root system in a single irrigation (y axis) is determined by the pipe length (x axis) and the diameter of the deep pot (lines). For example, a 14-inch pipe with a 1-inch diameter will hold approximately 0.15 quart of water; a 2-inch-diameter pipe will hold 0.75 quart; a 3-inch-diameter pipe will hold 1.7 quarts of water.
Deep pot irrigation allows for the introduction of soluble fertilizers (Section 5.2.1) and mycorrhizal fungi inoculum (Section 5.2.7) if seedlings require these treatments. Because soluble fertilizers are delivered directly to the roots bypassing the soil surface, weeds are not encouraged to grow. Care should be taken when determining fertilizer rates to avoid increasing soluble salts above levels that are toxic for root growth. Salt levels and pH of the irrigation water should be monitored to ensure that salts do not exceed toxicity levels for plant growth (Section 3.8.4, see Salts).
Determining when to irrigate can be based on the plant moisture stress (PMS). An accurate method for determining PMS is using a pressure chamber (Inset 5-23). This equipment reads plant stress (in negative bars) at the time of the readings. PMS readings should be made in the early morning, prior to sunrise, when diurnal PMS is at its lowest. Five seedlings should be collected in one area and averaged per site. If pre-dawn PMS readings are less than -15 bars, seedlings are under high moisture stress and should be irrigated soon to keep the seedlings from dying. If the objective of irrigation is for fast seedling growth, then PMS during plant growth (spring and fall) should be kept above -5 bars. PMS equipment is expensive to purchase. However, many USFS district offices use and maintain this equipment.
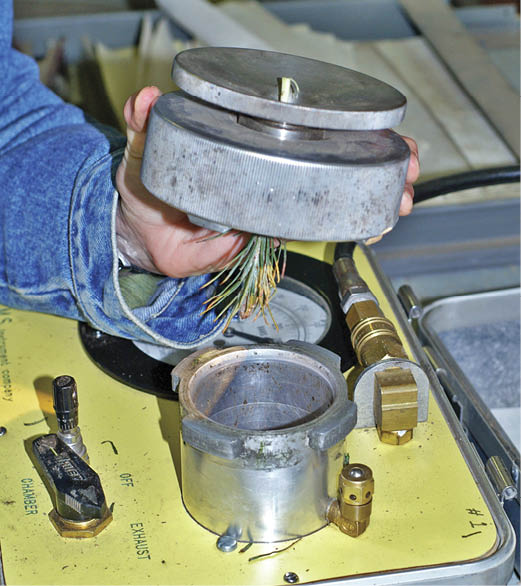
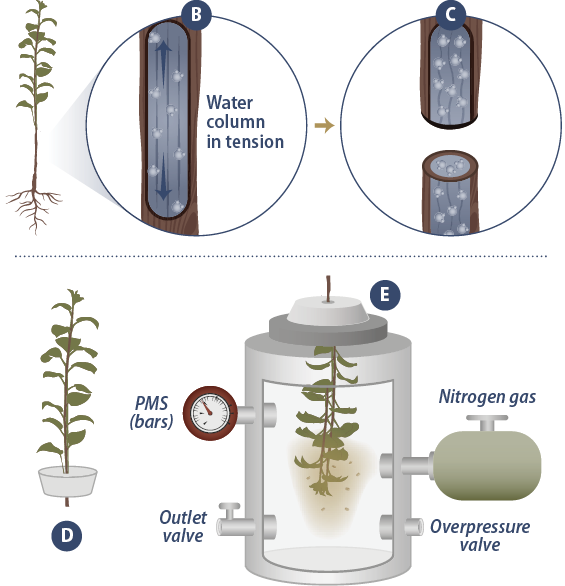
Inset 5-23 | Measuring plant moisture stress
Modified from McDonald 1984
Measuring plant moisture stress (PMS) with a PMS meter (A) is an accurate method to help determine the water needs and status of a plant. When a seedling is under moisture stress, it is pulling water from the soil through the stem. The water in the stem is under tension, much like a rubber band that is being stretched (B). When a small branch is cut, the tension in the stem is released and the water shrinks back from the cut surface (C). The further back the water shrinks, the more moisture stress the plant is under. The cut end of the stem is placed through a small hole in a stopper, with the end protruding from the lid (D). The foliage is placed in the steel chamber and tightened so it is airtight (E). Nitrogen gas is slowly applied into the chamber, exerting pressure through the stomata and pushing water through the stem toward the cut end. When the water just begins to emerge from the cut end, a pressure reading is made. This is the amount of suction or stress that the seedling is under at the time the sample was collected. Because PMS varies throughout a 24-hour period, seedling samples should be taken in the pre-dawn for consistency and comparison purposes.
PMS readings can be used to determine when to irrigate seedlings. If pre-dawn PMS readings are greater than -15 bars, seedlings are under high moisture stress and should be irrigated soon to keep the seedlings healthy. If the objective of irrigation is for fast seedling growth, then PMS during the plant growth (spring and fall) should be kept below -5 bars. PMS equipment is expensive to purchase; however, many USFS district offices use and maintain this equipment.
Photo credit: Thomas D. Landis
Drip Irrigation
Drip (or low pressure) irrigation is generally a temporary measure to help establish roadside plantings. It is typically used for one or two seasons to establish nursery-grown plants and then removed. Setting up drip irrigation might be considered extravagant. For projects where there is no tolerance for seedling failure, this can be a viable, economical alternative (Bean and others 2004).
Some advantages of using drip systems for roadsides are water efficiency, system flexibility, portability, and ease of application of soluble fertilizers. The main disadvantage is the high maintenance required to keep the system operational. Drip systems are composed of numerous points where failures can occur: storage tanks, burst end clamps, connectors, emitters, and hundreds of feet of pipe and drip irrigation tubing. For this reason, the system should be inspected and maintained regularly during the summer to ensure that all seedlings are being properly irrigated. This involves inspecting all emitters, pipes, tubing, and tanks. Emitters clog with sediment and insects (Bainbridge 2006c); animals gnaw through tubing when it is above ground; and plastic water tanks make great shooting targets. These types of damage to the system should be repaired before each irrigation cycle. Another disadvantage is that, on hilly sites, the system should be designed to maintain the correct pressure to each emitter.
In its simplest form, the drip irrigation system consists of a water source, mainline and side lateral pipes, and drip pipes and emitters. Frequently, drip irrigation systems will have pressure reducers that regulate head-gain pressure. The pressure reducers are inexpensive and are available in many sizes that can be matched to the system emitters. The system is under pressure during irrigation, which moves water from the water source, through the mainline and side laterals, to the emitters where seedlings are watered. The objective is to deliver equal amounts of water to each seedling. This is not a problem when the system is laid out on flat ground and pressures at any point in the system are equal, but flat terrain is seldom found on highway projects. On projects that have any slope gradients, there will be changes in pressure depending on the elevation of the emitters. The pressure change occurs at a rate of 1 lb/in2 (psi) per 2.31 feet elevation drop. This means that an emitter at an elevation that is 46 feet lower than the water source will have a psi of 20 (46 / 2.31 = 20), while an emitter at 92 feet lower than the water source will have a psi of 40 (92 / 2.31 = 40). Unless pressure-regulating techniques are used to reduce the pressure to the lower elevation emitters, the amount of water delivered to those emitters will be approximately twice that of the upper elevation emitters. Compensating for pressure changes is critical for delivering equal amounts of water to each seedling. Systems that do not compensate will have seedlings that receive too much water, while others will not receive enough during an irrigation cycle.
Water Source—The water source constitutes the beginning point of the drip system. It is typically the most uphill point because it should feed every emitter below. Water is typically trucked to the site and pumped directly into the mainline or stored in temporary, portable storage tanks (Figure 5-133). Water trucks range in capacity from 1,000 to 2,500 gallons. If there is a location for a portable water storage tank above the planting area, gravity feed can be used to pressurize the system. Operational water pressure for a drip system ranges from 20 to 40 psi. To achieve a minimum pressure of 20 psi with a gravity feed system requires a 46-foot elevation drop from the storage tank to the first line of emitters (20 * 2.31 = 46). If this drop does not exist, then a pump will be needed to augment the pressure.
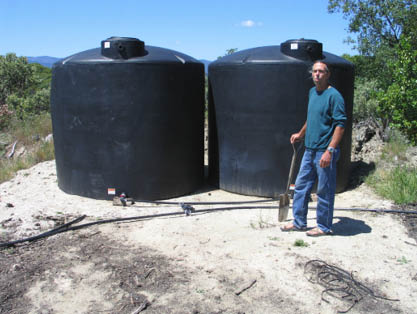
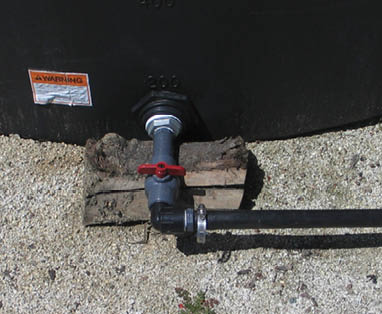
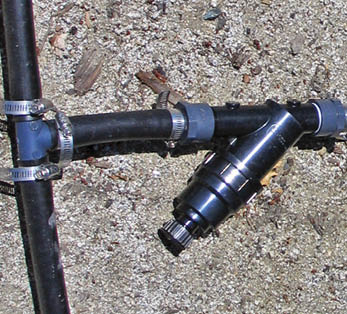
Figure 5-133 | Large water holding tanks
Large holding tanks are used for temporary drip irrigation systems (A). A simple on/off valve controls water to the gravity-feed system (B). Pressure release valves (C) are used to control water pressure on hilly sites.
Photo credit: David Steinfeld
Components of a temporary water tank system include filters, on-off valve, and an inline pressure-reducer (if the water source pressure is greater than 40 psi) (Stryker 2001). When planning water storage, ease of access is an important consideration. Sometimes water will need to be pumped a substantial distance to a water storage tank. In other cases, more than one tank will be required to reach all planting areas in complex terrain. Water from unknown sources should be sent to a qualified lab and analyzed for contaminants and impurities (Zoldoske 1998). Chances are that most water sources will have impurities that will clog very small drip emitter openings. Installing a 100 (150 micron) to 150 (100 micron) mesh filter is recommended (Stryker 2001).
Mainline and Laterals—The mainline delivers water from the water source to the lateral pipes. The layout of the mainline and laterals can compensate for pressure changes associated with hilly terrain. A series of parallel lateral lines can be laid out perpendicular to the slope gradient. Because each line is on the contour, there is no pressure difference between emitters within a line. Between lateral lines, however, there is change in pressure based on 1 psi per 2.31 feet of elevation drop. Placing a pressure regulator at the connection between the mainline and each lateral line can compensate for the pressure increase with elevation drop.
The drip tubing diameter determines the volume of water that can be carried in the lateral lines and the rate it will be delivered based on friction losses. A 2-inch pipe, for example, carries four times as much water as a 1-inch pipe, but the costs are correspondingly much higher. For long stretches, increased frictional losses inside narrow diameter pipes can cause inadequate water coverage. Increasing water pressures or increasing pipe diameters can compensate for this.
The carrying capacity is the amount of water that specific tubing can deliver under a specific line pressure. For example, 0.75-inch tubing has a carrying capacity of approximately 160 gallons per hour at a line pressure of 20 psi, whereas a 1-inch pipe has a carrying capacity of 370 gallons per hour at the same pressure. Charts are available that compare various tubing diameters, emitter outputs, and system pressures for determining the length of tubing. These charts should be referenced when designing an efficient drip system.
Emitters—From the laterals, water flows through a smaller diameter pipe to the emitter, which meters out water directly to the base of each plant. Emitters apply water to the soil surface without wasting water on the surrounding area, thus discouraging non-target species. When emitters are placed in a deep pot irrigation system, water efficiency is increased further because water is delivered directly to the roots. There are many types of emitters, but pressure compensating emitters work well on hilly topography because they are designed to discharge water at uniform rates under a range of water pressures. With pressure compensating emitters, a system at 15 psi would have the same emitter flow rate as a system at 45 psi (Stryker 2001).
These emitters are two to three times more expensive than non-compensating emitters. Emitters come in a range of flow rates, with the most common rates of 0.5 gallon/hour and 1.0 gallon/hour. Choosing the flow rate for the emitters should be based on soil texture, the water requirements of the plants, the water delivery capabilities of a system, and budget. Most designers agree that placing two emitters at each plant is better than one emitter with twice the output because the water distribution area will more closely match the rooting profile of the plant. Two emitters also offer backup should one of the emitters become clogged.
A good grasp of the soil drainage and water storage characteristics is necessary in choosing emitter capacity and duration of irrigations. Well-drained soils (e.g., sandy texture or high coarse fragments) require emitters with higher flow rates but shorter irrigation time. However, poorly drained soils (higher in clays or compacted) require lower output emitters and longer irrigations. The size of planting stock will influence the number of emitters and flow rates; the larger the planting stock, the longer the irrigation cycles and the more output emitters that are needed.
There are a limited number of emitters that can be installed on any one lateral line. For example, 0.75-inch pipe or tubing delivers approximately 160 gallons per hour. The number of emitters that can be installed on the line will vary by emitter output rates. Installing 0.5 gallon/hour emitters allows approximately 300 emitters (600 / 2 = 300) on the line. If two emitters were placed by each plant, 150 plants could be watered on a line. If the emitters were rated at 1.0 gallon/hour, then 75 plants could be watered.
Installation—The installation of a drip system involves placing pipe and inserting emitters. Tubing comes in rolls and is easiest to lay out like a wheel to keep kinks from developing in the line. Lateral tubing should be placed upslope from the plant, which will act like a stake should the tubing move downslope. Tubing migrates until it has been used for a while and may require periodic staking. When the main line and laterals are in their general locations, the system is filled with water to flush the pipes clean. The ends are clamped or plugged and then filled again. This will reveal whether there are any leaks or problems to fix before installing the tubing to the emitters. A pressure gauge should be used at this time to take readings across long runs within or between lateral lines to check consistency of pressures. If there are problems, they should be corrected at this time. Puncturing tubing for emitters can be done when the system is charged with water so that adequate emitter flows and problems are seen immediately. Some designers choose to bury emitters below the soil surface to reduce surface evaporation. Losing visual inspection, however, usually outweighs the benefits of this strategy (Zoldoske 1998).
Operation—Prior to operating the drip system, the system should be flushed to eliminate any dirt that got into the piping during construction and filters must be cleaned. Check salt levels and pH of the irrigation water using a pH/conductivity meter to ensure that salts do not exceed the toxicity levels for plant growth (Section 3.8.4, see pH). Once these measures have been taken, the system can be opened and lines and emitters can be inspected. If emitters need cleaning, repair, or repositioning, it is done at this time. Tools and spare parts for the system are brought along and used where needed. When to irrigate should be determined through PMS monitoring (Inset 5-23). Determining the duration of the irrigation cycle can be done once or twice during the growing season through a visual inspection of soil profiles dug below several emitters. The wetting front should be observed several hours after the system has been shut off because the wetting front will have stabilized at that time. The irrigation system can be used to train the plant to grow roots deep. Unless deep pot plants are used, new installations have plants with shallow roots and watering should begin by being frequent and shallow. Watering should transition to less frequent and longer duration so that water penetrates deeper into the soil. The surface soil will dry while deeper soil will remain wet and the plant roots will follow the water. The metering of the water is made easy with the use of inexpensive battery powered remote control valves and small and reuseable solar powered controllers.